Work Notes | Cloning Azure VMs to a Different Tenant and Subscription
I am setting up a set of SAP HANA VMs in a new subscription on a different tenant. These VMs comprise of:
- 1 WS 2016 Jump Box Server with 1 unmanaged OS disk
- 1 SUSE Linux App Server with 1 managed OS disk and 2 data disks
- 1 SUSE Linux HANA DB Server with 1 managed OS disk and 10 data disks
My thought was that rather than recreating all 3 VMs from scratch, can I simply clone these?
This blog post is an unrefined post as I go work through this. Let’s see how it goes, hope I succeed in the end.
Section 1: Cloning a VM with an Unmanaged Disk
Ok, let’s start with the easy stuff.
Searching around, the following URLs seem to be good references on how to do this:
- Quickstart ARM template using an existing VHD: https://github.com/Azure/azure-quickstart-templates/tree/master/201-vm-specialized-vhd-new-or-existing-vnet
- Powershell: https://blogs.infosupport.com/creating-a-vm-in-azure-based-on-an-uploaded-vhd/
Step 1: Copy the VHD
This is relatively easy.
- Created a storage account in the target subscription
- Opened Azure Storage Explorer
- Looked for the .vhd file of the original VM
- Copied the .vhd file to the target storage account
Step 2: Create the same VNet Configuration
Before I can create a VM from an existing VHD, I need to make sure my VNet is set-up in the target subscription… done.
Attempt 1: ARM Template
Ok let’s try using this quickstart ARM template. If it works, I don’t need to use powershell anymore.

After filling the above parameters, I realized that my Jump Box WS 2016 VM isn’t generalized.
I hope this works, as I can’t afford to sysprep (given that this VM is being used) and would rather just recreate the jump box from scratch.
Result: Successful with a Caveat…
It created the VM. Tried remoting in and I see all my installed applications and other configurations. It is successful!

Small caveat is that the created VM resources don’t follow the resource names in the original configuration. This is understandable since the ARM template didn’t ask for this input.
This may be a minor or major issue. It can be major since it will not follow your preferred naming standards. See here for naming convention best practices.
A more significant change is that the created VM converted my VHD to a managed disk.
It works for my purpose, but documenting here for reference.
Section 2: Cloning VMs with Managed Disks
Attempt 1: Works only if target subscription is in the same AAD tenant
There seems to be many online articles around this, some in Azure docs and some by others. This seems the most concise article that I’d like to refer to: https://www.techmanyu.com/how-to-quickly-clone-a-vm-in-azure/
Tried and got a LinkedAuthorizationFailed exception.

After looking around, I found this description here, but no solution.
Check if your account belongs to the same tenant as the resource group you’re deploying to.
Ok… so I need a way to clone a managed disk cross-tenant…
Attempt 2: Restore a Snapshot
Maybe I can simply restore a snapshot? I also found this, which provides a method for exporting a snapshot to a storage blob.
So first, I create a disk based from a snapshot or storage export. I see these options in the Azure Portal
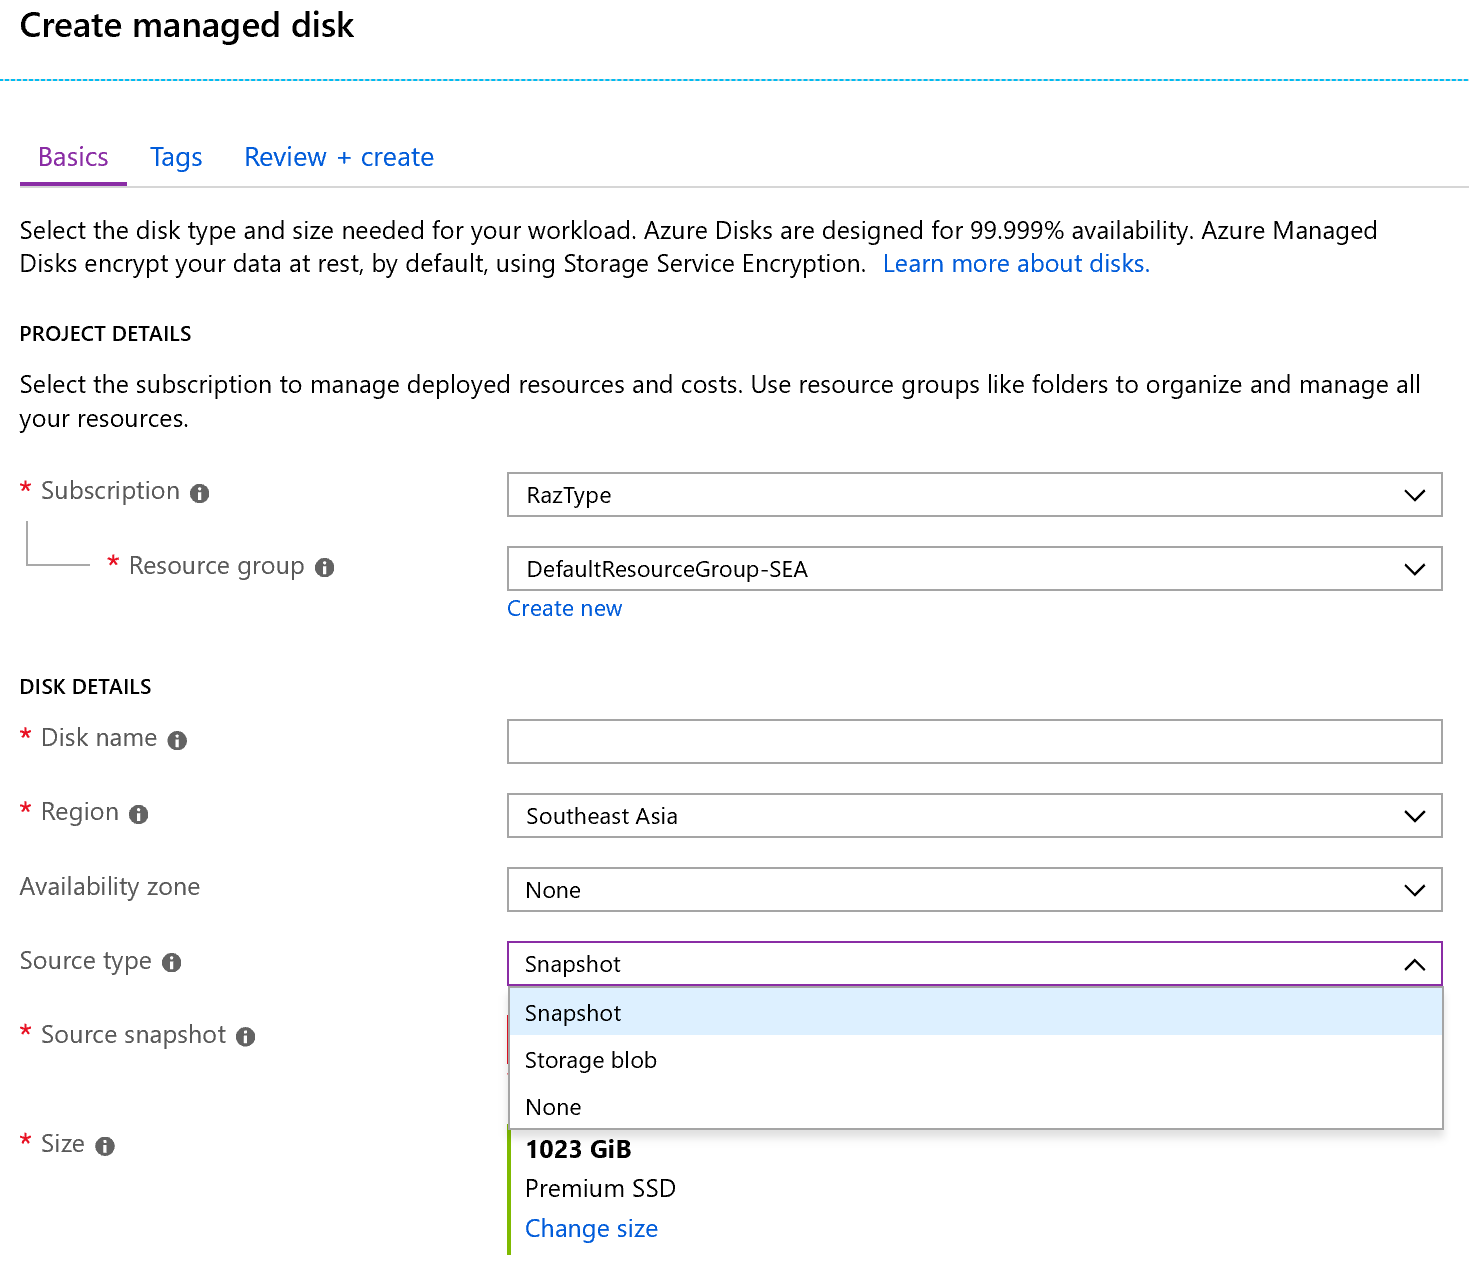
However, source snapshots and storage blob only sees resources in my current tenant

Ok, seems like I first need to export the snapshot to a storage account (from my source subscription) and copy the export to a storage account in my destination subscription.
Attempt 3: Export Snapshot to VHD, Copy to Target Subscription, Create a VM
Let’s see if this method works. First, some additional research.
We can export snapshots, which looks like the Azure portal way of the script I found in Attempt 2.
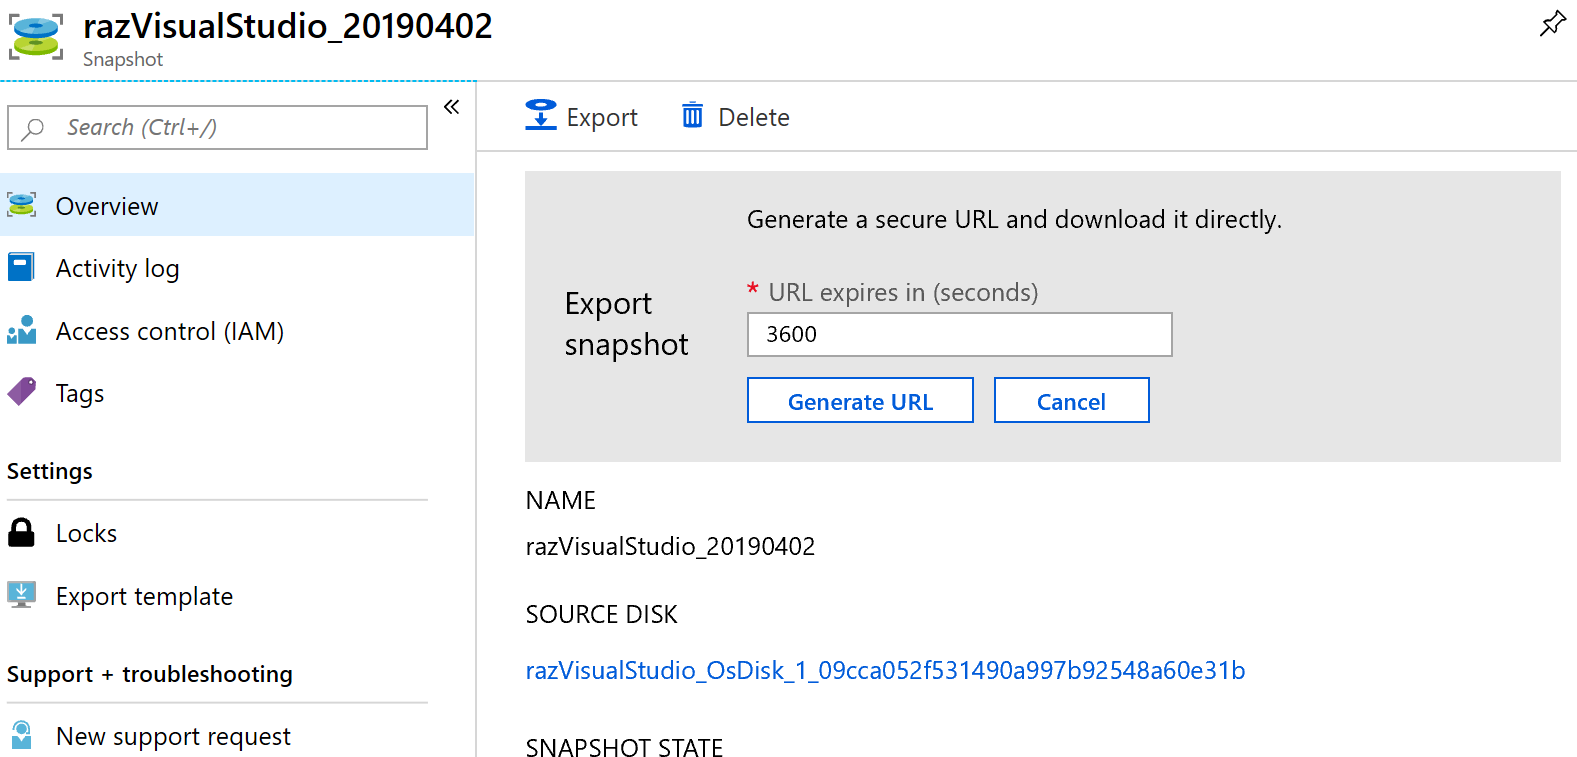
*Note: screenshot above is a different VM, but used for research purposes
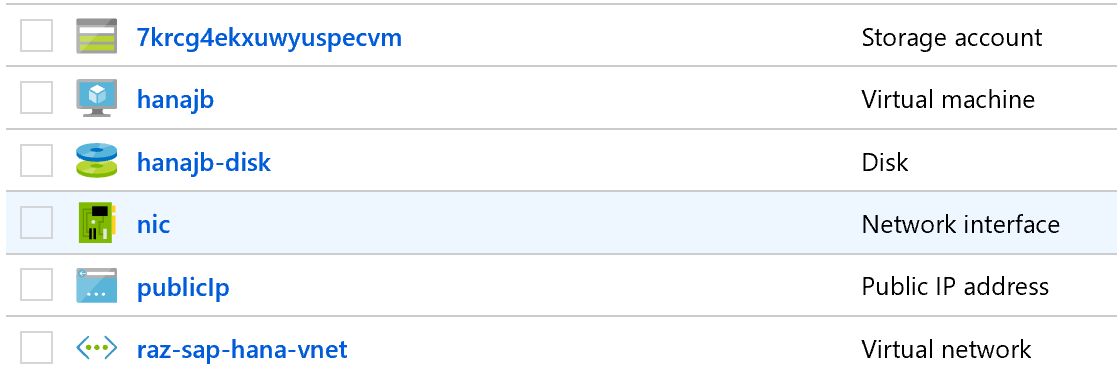
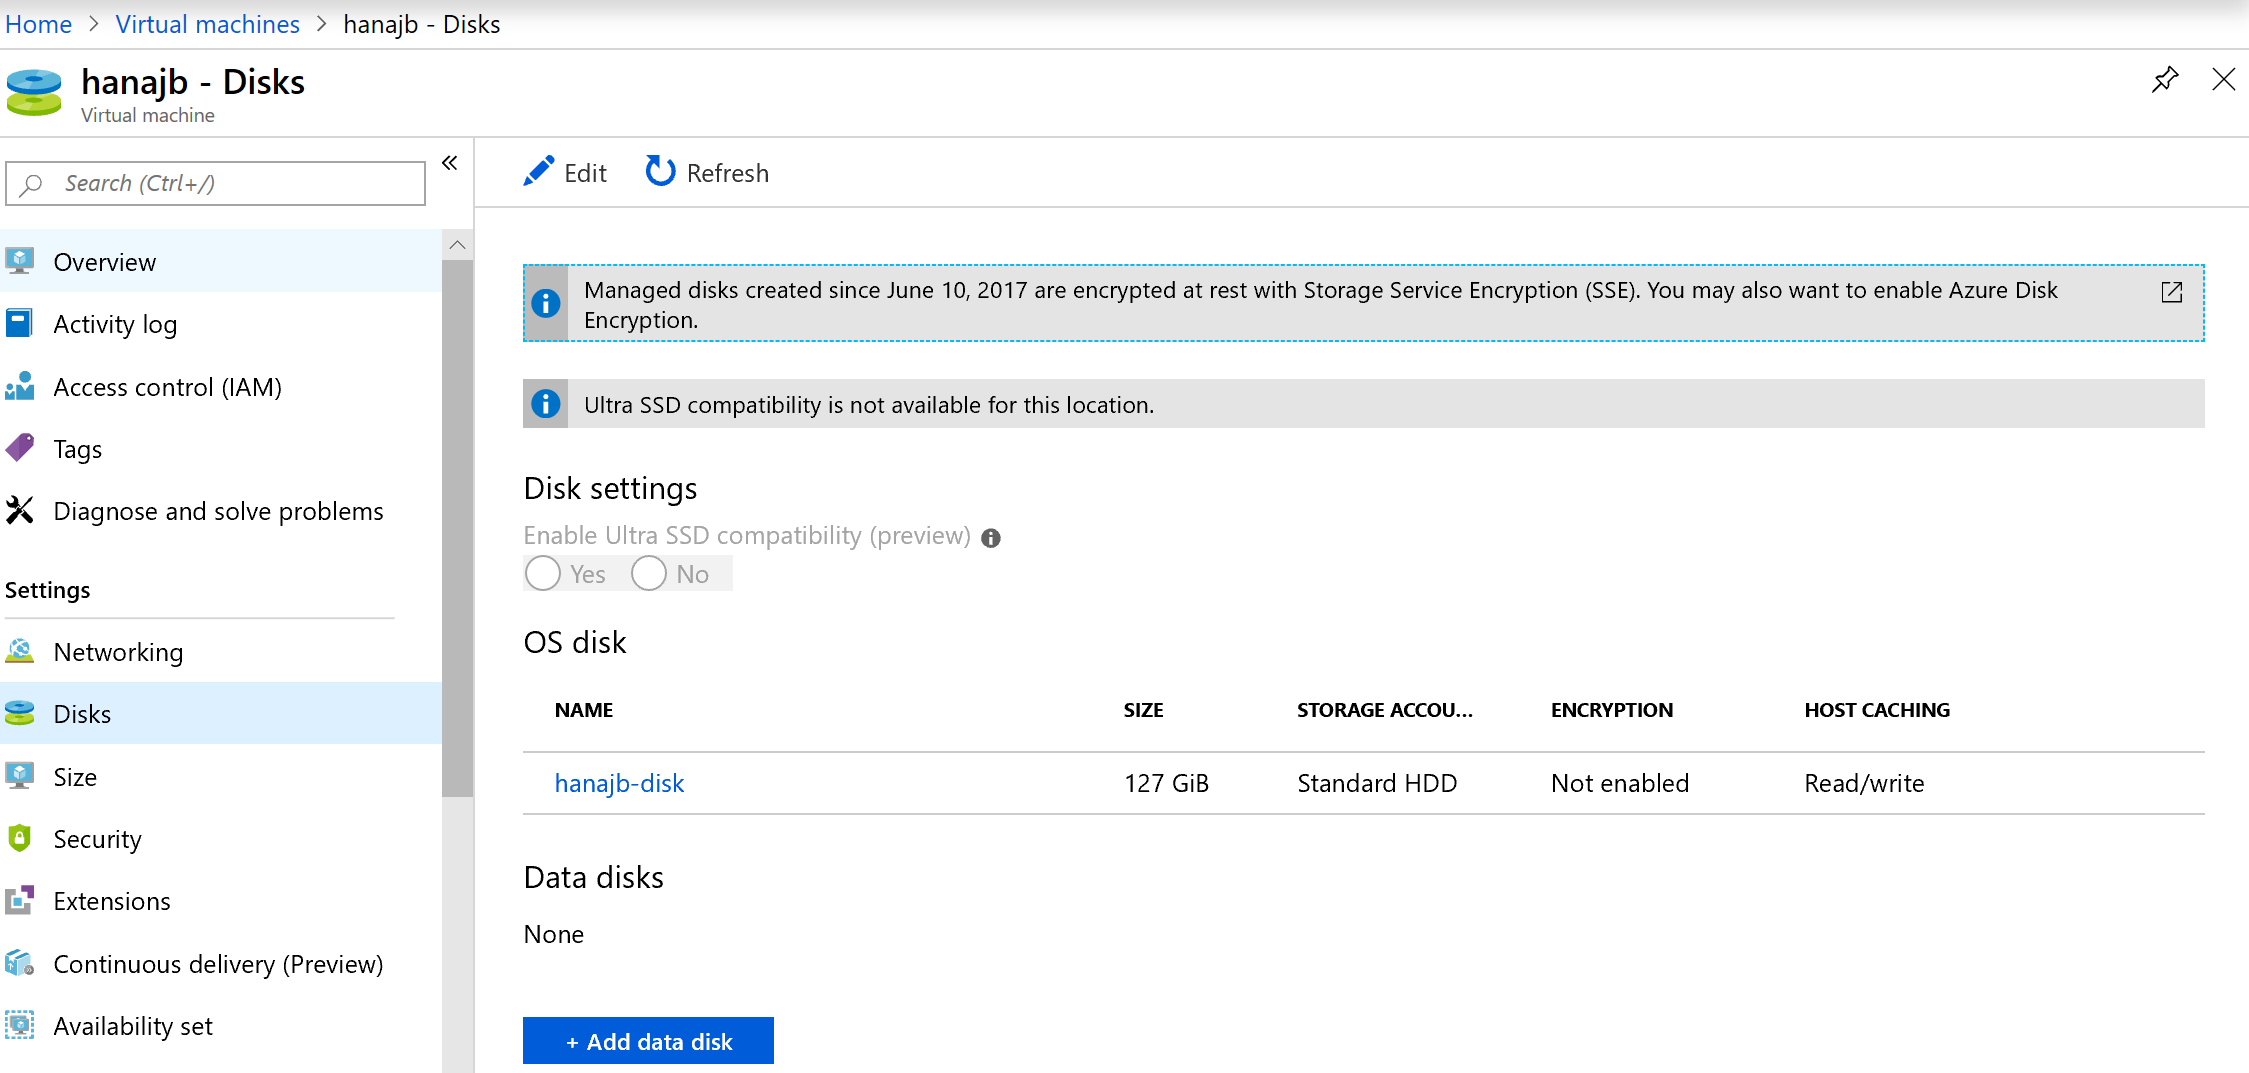
Looking at the VM that I wanted to clone, I see multiple disks to create snapshots…
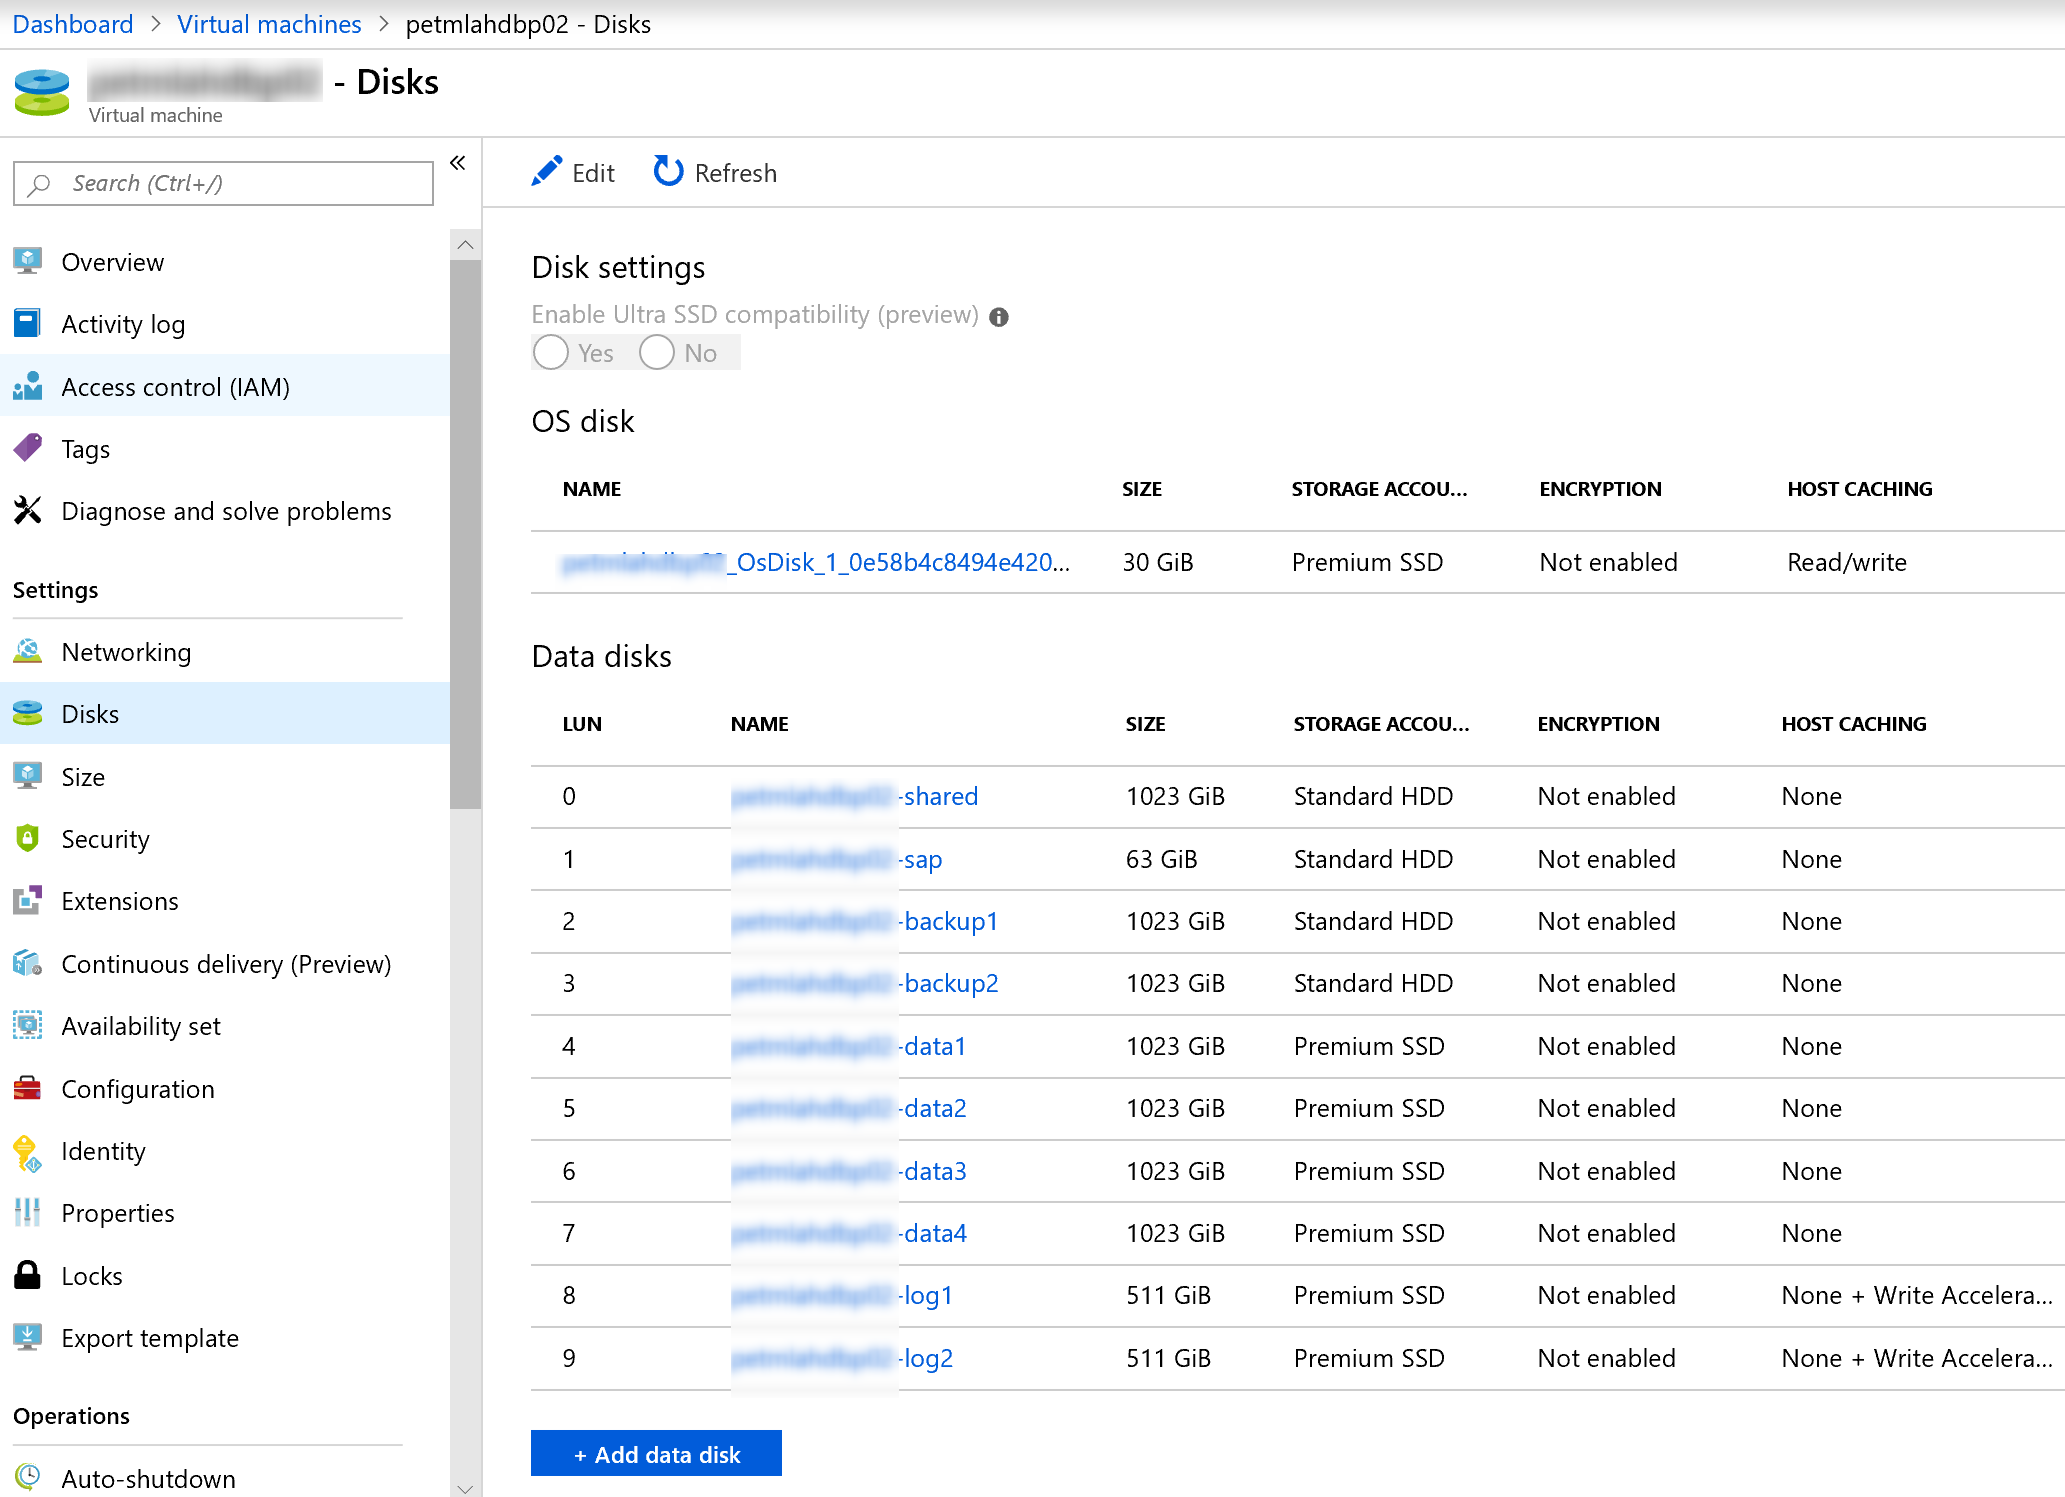
After clicking on the disk, I find that there is a Create Snapshot button and a Disk Export button.
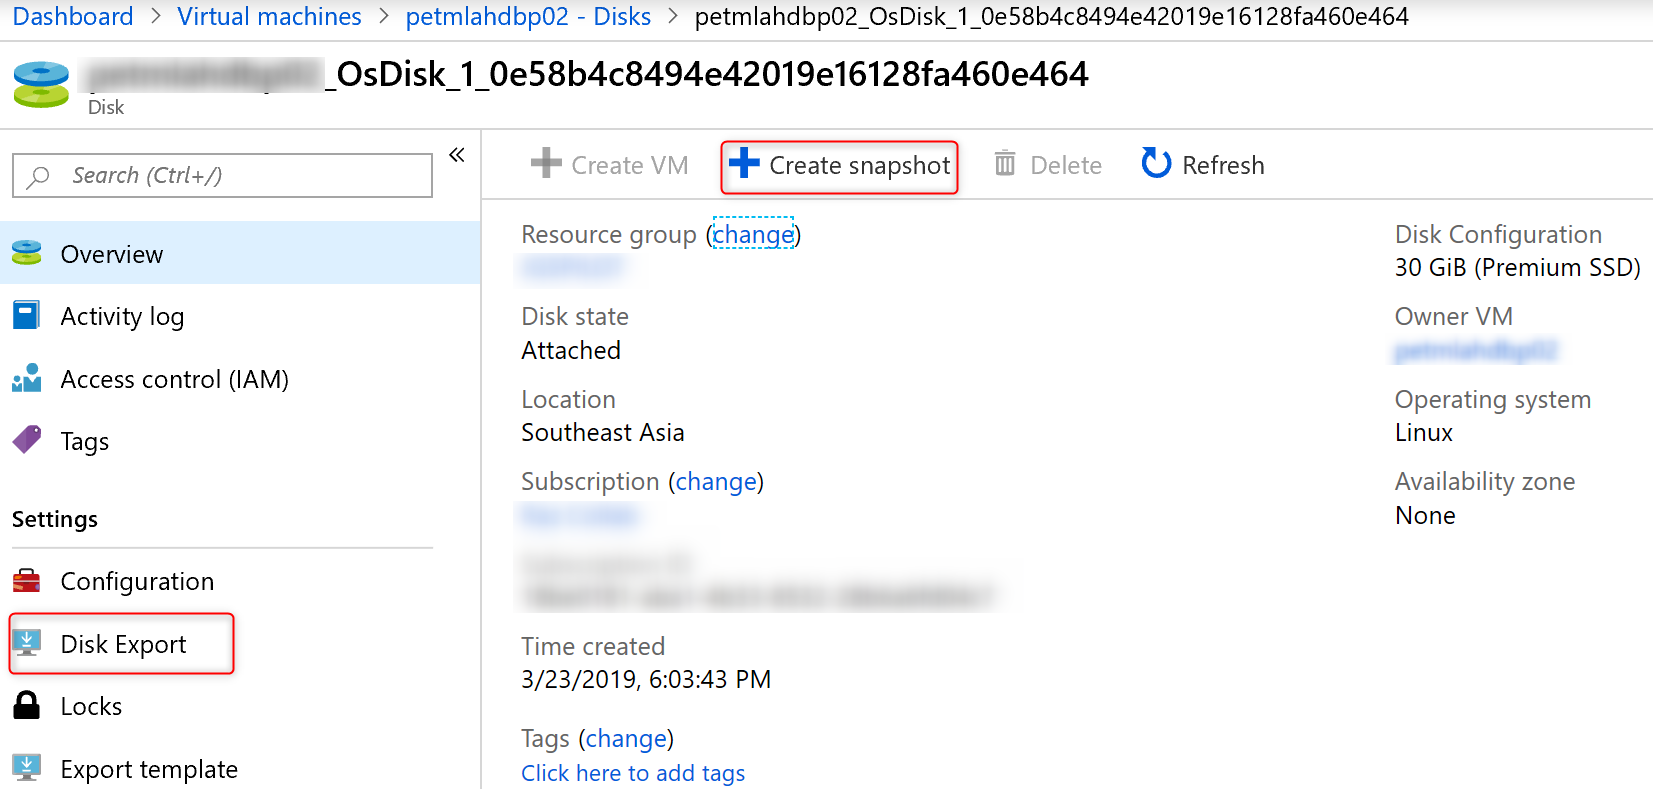
What is Disk Export?
I can’t seem to find any documentation on what this is. So I’ll just try it out. The VM needs to be stopped before I can do an export.
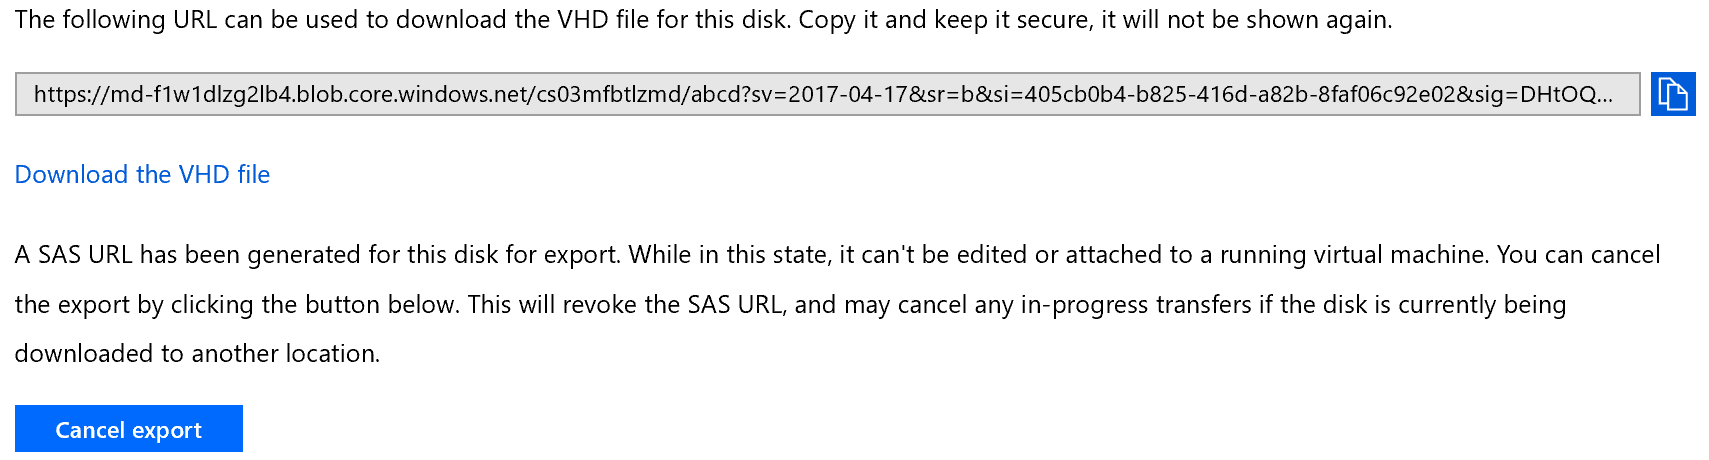
After exporting, it creates a Storage SAS Url and allows me to download the disk VHD! Interesting…
So here’s the approach in my head:
- Export all disks to VHDs
- Use AzCopy to copy VHDs to target subscription storage
- Use the same method in Section 1 to create a VM using a VHD…
Just that I am creating a VM with multiple disks this time, so it won’t be completely like Section 1…
Step 1: Export all disks to VHDs with a longer SAS expiry (to leave time for AzCopy to complete)….
DONE.
Step 2: Use AzCopy to copy VHDs to target subscription storage…
There are many SAS URLs which will take time. I need to create a set of scripts and run it overnight…

AzCopy commands generated are
1
2
3
4
5
6
7
8
9
10
11
12
13
14
AzCopy /Source:"https://md-pcm0lrbrw3jw.blob.core.windows.net/pvd4wsfjf0g5/abcd?sv=2017-04-17&sr=b&si=eb7da1c4-b013-4730-862f-d875c02d4eab&sig=yfcwxLjqLO8Dvd6%2FgJEUAKaXqw21cfWuKb9AsPD04ao%3D" /Dest:https://razhanastore.blob.core.windows.net/hanadb02/hanadb02_OsDisk_1_0e58b4c8494e42019e16128fa460e464 /DestKey:STORAGE_KEY /Y
AzCopy /Source:"https://md-c31kch2hlfxr.blob.core.windows.net/45dx2mcbzkz0/abcd?sv=2017-04-17&sr=b&si=77228275-c01e-421a-8d54-e9529dc816e0&sig=jStkK0ho67kJ9kRvtZKoONNDgI8y8jdSk3ixfp8EyCA%3D" /Dest:https://razhanastore.blob.core.windows.net/hanadb02/hanadb02-backup1 /DestKey:STORAGE_KEY /Y
AzCopy /Source:"https://md-c31kch2hlfxr.blob.core.windows.net/pcpw1xvrb5dz/abcd?sv=2017-04-17&sr=b&si=edf767f9-0792-4e70-a630-ce35cabd8887&sig=ohGMeERSThMYGHjgSd%2F4ECjj1h%2FVomGOGBEPWIZnuIc%3D" /Dest:https://razhanastore.blob.core.windows.net/hanadb02/hanadb02-backup2 /DestKey:STORAGE_KEY /Y
AzCopy /Source:"https://md-pcm0lrbrw3jw.blob.core.windows.net/dl00h0jlgzp2/abcd?sv=2017-04-17&sr=b&si=1350b11c-e691-4a8a-9008-56b0f5d98c68&sig=awAaKV9OvTYV9X9%2FLrZzXDfWJ8RqDIpwK7ufkMH4DzA%3D" /Dest:https://razhanastore.blob.core.windows.net/hanadb02/hanadb02-data1 /DestKey:STORAGE_KEY /Y
AzCopy /Source:"https://md-pcm0lrbrw3jw.blob.core.windows.net/tkrxlz4ktvfh/abcd?sv=2017-04-17&sr=b&si=103468ca-e5d6-4bd5-b95b-1a4357aae1ff&sig=LPAwWwXeF4qEG%2FEeQt%2FKQgC4O01Gs5zyZaUsDGWI4AA%3D" /Dest:https://razhanastore.blob.core.windows.net/hanadb02/hanadb02-data2 /DestKey:STORAGE_KEY /Y
AzCopy /Source:"https://md-pcm0lrbrw3jw.blob.core.windows.net/sn1c5zzvg0g3/abcd?sv=2017-04-17&sr=b&si=9ff7b557-3a4a-4b17-ba0d-dfc5f82135fb&sig=%2FAr6dg%2FJqVp%2F2RKttOxXyvH1AXZJIjnH6wGNm76Zfws%3D" /Dest:https://razhanastore.blob.core.windows.net/hanadb02/hanadb02-data3 /DestKey:STORAGE_KEY /Y
AzCopy /Source:"https://md-pcm0lrbrw3jw.blob.core.windows.net/ldqrlhdrk0j2/abcd?sv=2017-04-17&sr=b&si=0deab9d6-9f05-42dd-8787-eb0be66b7729&sig=zRyIDsV6IoNMyBlYP4zAm6aN9Gbgzbqk3PndfsbZ1cs%3D" /Dest:https://razhanastore.blob.core.windows.net/hanadb02/hanadb02-data4 /DestKey:STORAGE_KEY /Y
AzCopy /Source:"https://md-pcm0lrbrw3jw.blob.core.windows.net/fggqq0fmpxvz/abcd?sv=2017-04-17&sr=b&si=276ca45c-86df-434b-a5fa-6e0072096782&sig=QhwyBoOhWEKkmfz4OuQcAums4PquFHWHIM0Bi8Rl2BQ%3D" /Dest:https://razhanastore.blob.core.windows.net/hanadb02/hanadb02-log1 /DestKey:STORAGE_KEY /Y
AzCopy /Source:"https://md-pcm0lrbrw3jw.blob.core.windows.net/stxqj5xds1s2/abcd?sv=2017-04-17&sr=b&si=380cce72-a1c4-411f-9878-5a8920a12487&sig=eIeyur%2BJR7p1hd2fItSYDpHzJsAkzt14dKxphglXS%2F8%3D" /Dest:https://razhanastore.blob.core.windows.net/hanadb02/hanadb02-log2 /DestKey:STORAGE_KEY /Y
AzCopy /Source:"https://md-c31kch2hlfxr.blob.core.windows.net/jzplnhqs3kn5/abcd?sv=2017-04-17&sr=b&si=d617164b-42ca-44cf-b3a8-02f68b024a61&sig=mTS8Yct4RyVgYEJDuMQ6j8XKHrXQ2c17UqaVxs3qjos%3D" /Dest:https://razhanastore.blob.core.windows.net/hanadb02/hanadb02-sap /DestKey:STORAGE_KEY /Y
AzCopy /Source:"https://md-c31kch2hlfxr.blob.core.windows.net/tpx15cqclbwm/abcd?sv=2017-04-17&sr=b&si=09a0ba7d-d794-4ba7-87fe-a5125876d8c4&sig=IvGwWDrRN%2BHQ18UYO5rPmrF5CTUa%2Bn2zXrsmzBZkDH8%3D" /Dest:https://razhanastore.blob.core.windows.net/hanadb02/hanadb02-shared /DestKey:STORAGE_KEY /Y
AzCopy /Source:"https://md-f5wr32k5mj0v.blob.core.windows.net/rlgnqj1zst45/abcd?sv=2017-04-17&sr=b&si=60e550af-9245-4430-8004-82e92d0c07ea&sig=n0vni%2BAXG2%2FsOXJsCIwpiZQcfaxX4SSqk59sWZgNfy8%3D" /Dest:https://razhanastore.blob.core.windows.net/app001/app001_OsDisk_1_35424bfd6952479e95342313ed2378d3 /DestKey:STORAGE_KEY /Y
AzCopy /Source:"https://md-f5wr32k5mj0v.blob.core.windows.net/lvwv3gcpkrrv/abcd?sv=2017-04-17&sr=b&si=63c00a90-d384-4270-a76f-cb8ee3c5d9d6&sig=p%2Fwh8dvVr2hVQrAS4ahf6O%2FSr%2FYJeVAtfopQqRmSTRM%3D" /Dest:https://razhanastore.blob.core.windows.net/app001/app001-data0 /DestKey:STORAGE_KEY /Y
AzCopy /Source:"https://md-f5wr32k5mj0v.blob.core.windows.net/f4zc2pkzgrl4/abcd?sv=2017-04-17&sr=b&si=7288cbcf-3403-41eb-8b5c-c255c3f2cc96&sig=casAPHz53Bl4Q9ilECnPtbGWV2B7yR6uS3ErFiWvA7g%3D" /Dest:https://razhanastore.blob.core.windows.net/app001/app001-data1 /DestKey:STORAGE_KEY /Y
Ran this command and saw the VHDs in my target subscription/storage.
Step 3: Create VM using Powershell
The quickstart ARM template doesn’t work in this scenario given that I have multiple disks (it will work if you are cloning a VM with a single managed disk).
So I’ll probably need to use powershell and this seems to be the best reference: https://docs.microsoft.com/en-us/azure/virtual-machines/windows/create-vm-specialized
While this article is for Windows, it should just be the same. Also found a powershell command Set-AzVMDataDisk which I can potentially use to attach my data disks.
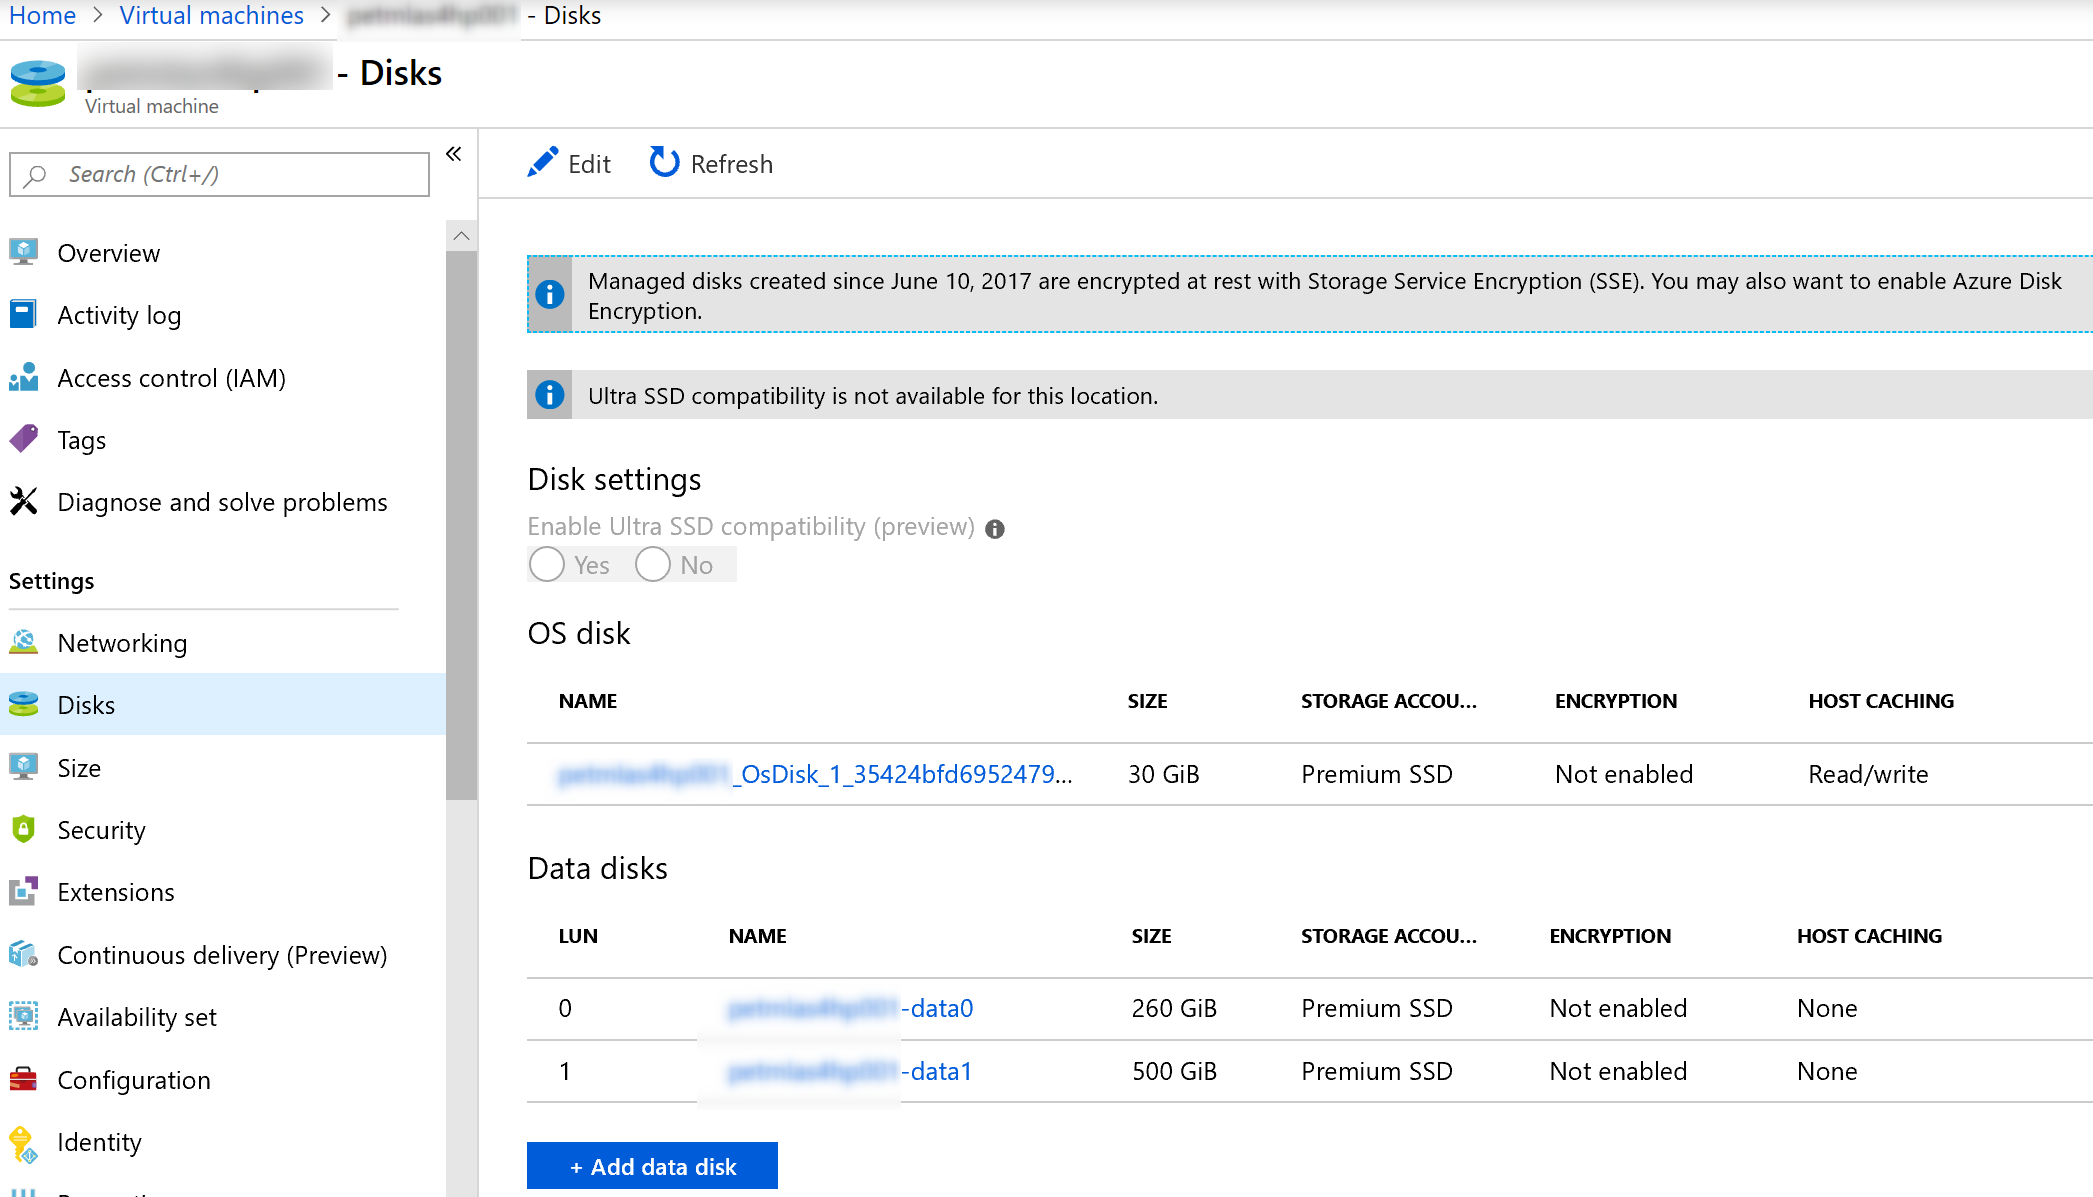
Result: Successful
Attempt 3 works!
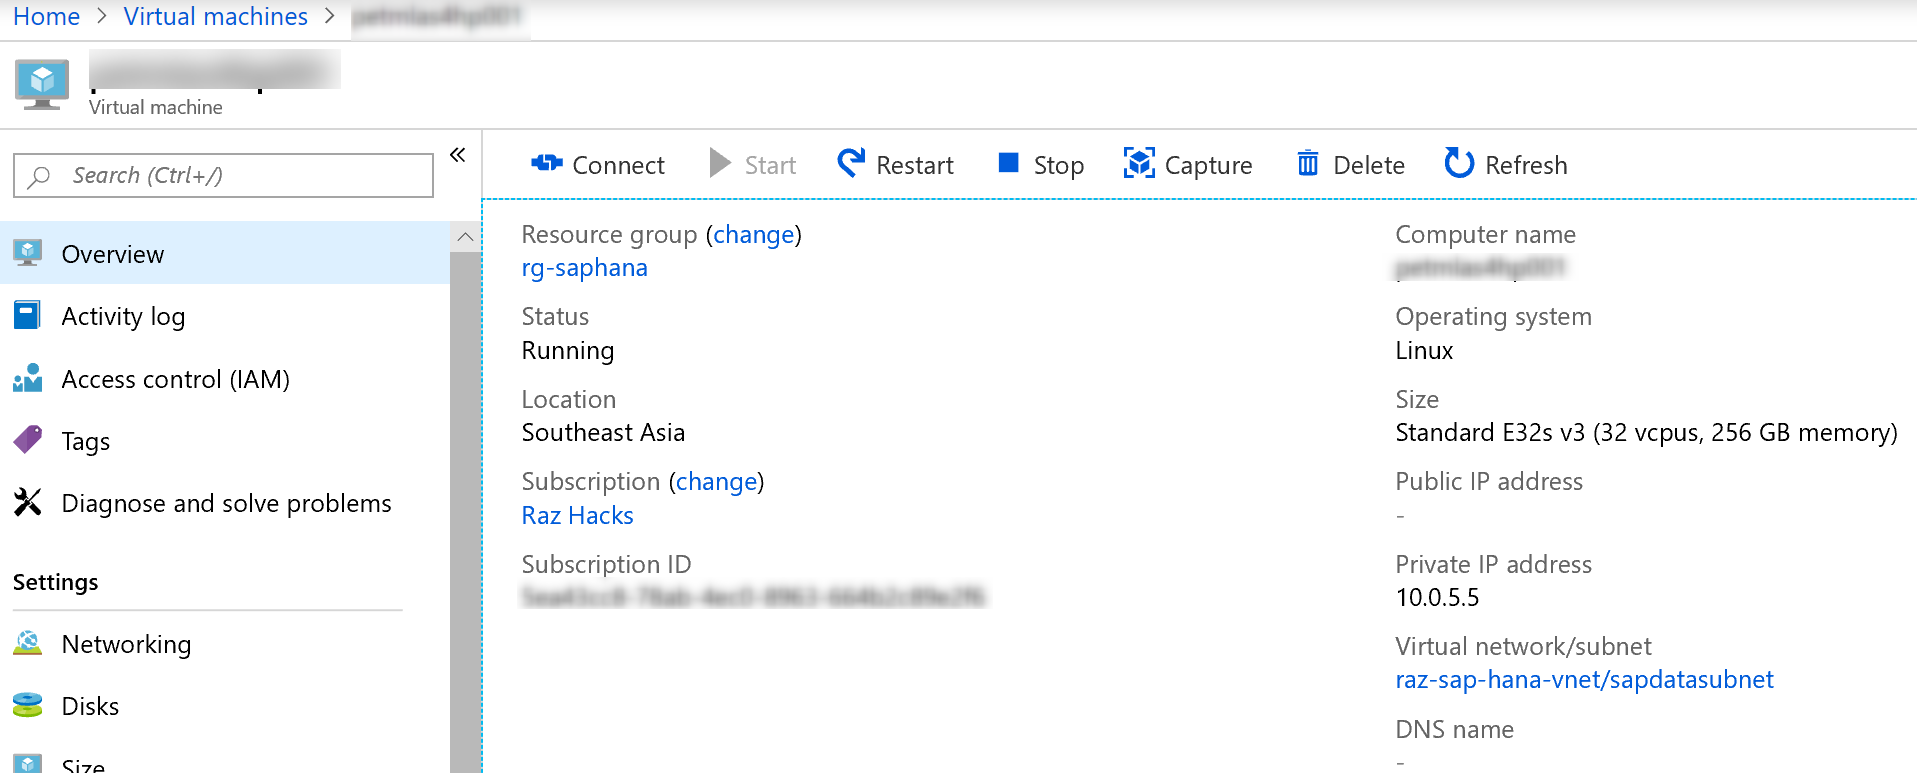
Beautiful list of disks attached to the created VM…
For reference, this is the powershell script that I used
1
2
3
4
5
6
7
8
9
10
11
12
13
14
15
16
17
18
19
20
21
22
23
24
25
26
27
28
29
30
31
32
33
34
35
36
37
38
39
40
41
42
43
44
45
46
47
48
49
#Connect-AzAccount
#Select-AzureSubscription -SubscriptionName "Raz Hacks"

$vmName = 'myoriginalvm'
$location = 'southeastasia'

$vnetName = 'raz-sap-hana-vnet'
$vnet = Get-AzVirtualNetwork -Name $vnetName

#Create Managed Disk from VHD
$destinationResourceGroup = 'rg-saphana'

$osDiskSourceUri = 'https://razvmhanastore.blob.core.windows.net/' + $vmName + '/' + $vmName + '_OsDisk_1_35424bfd6952479e95342313ed2378d3.vhd'
$osDiskName = $vmName + '_OsDisk_1_35424bfd6952479e95342313ed2378d3'
$osDisk = New-AzDisk -DiskName $osDiskName -Disk `
    (New-AzDiskConfig -AccountType Premium_LRS -Location $location -CreateOption Import -SourceUri $osDiskSourceUri) `
    -ResourceGroupName $destinationResourceGroup

$data0DiskSourceUri = 'https://razvmhanastore.blob.core.windows.net/' + $vmName + '/' + $vmName + '-data0.vhd'
$data0DiskName = $vmName + '-data0'
$data0Disk = New-AzDisk -DiskName $data0DiskName -Disk `
    (New-AzDiskConfig -AccountType Premium_LRS -Location $location -CreateOption Import -SourceUri $data0DiskSourceUri) `
    -ResourceGroupName $destinationResourceGroup

$data1DiskSourceUri = 'https://razvmhanastore.blob.core.windows.net/' + $vmName + '/' + $vmName + '-data1.vhd'
$data1DiskName = $vmName + '-data1'
$data1Disk = New-AzDisk -DiskName $data1DiskName -Disk `
    (New-AzDiskConfig -AccountType Premium_LRS -Location $location -CreateOption Import -SourceUri $data1DiskSourceUri) `
    -ResourceGroupName $destinationResourceGroup


#Create a NIC (no public IP address)
$nicName = $vmName + '-nic'
$nic = New-AzNetworkInterface -Name $nicName `
   -ResourceGroupName $destinationResourceGroup `
   -Location $location -SubnetId $vnet.Subnets[0].Id

#Create VM Config
#$vmConfig = New-AzVMConfig -VMName $vmName -VMSize "Standard_M32ls"
$vmConfig = New-AzVMConfig -VMName $vmName -VMSize "Standard_E32s_v3"
$vm = Add-AzVMNetworkInterface -VM $vmConfig -Id $nic.Id

$vm = Set-AzVMOSDisk -VM $vm -ManagedDiskId $osDisk.Id -StorageAccountType Premium_LRS -DiskSizeInGB 30 `
    -CreateOption Attach -Linux
$vm = Add-AzVMDataDisk -VM $vm -ManagedDiskId $data0Disk.Id -Caching ReadOnly -CreateOption Attach -Lun 0
$vm = Add-AzVMDataDisk -VM $vm -ManagedDiskId $data1Disk.Id -Caching ReadOnly -CreateOption Attach -Lun 1

#Create the VM
New-AzVM -ResourceGroupName $destinationResourceGroup -Location $location -VM $vm