GitHub Copilot Business for Non-GHE (GitHub Copilot Standalone) EMU Initial Setup
This article is also posted in Microsoft Dev Blogs - All things Azure.
This post is a version of my GitHub Enterprise Cloud EMU Initial Setup Guide, but revised for GitHub Copilot Business for Non-GHE (GHCBnonGHE or GitHub Copilot Standalone). To be more specific, this guide is for the Enterprise Managed Users (EMU) instance of GitHub Copilot Standalone, with Microsoft Entra ID serving as the Identity Provider (IdP).
Objective and Disclaimer: This post is written for my future personal reference. I compiled screenshots from my previous articles and an existing GHCPnonGHE (EMU) account. There will surely be scenarios which are not covered in this post. Please refer to the official GitHub article for the most accurate and up-to-date information.
GitHub Copilot Business for Non-GHE EMU Account Activation
This is a special account that cannot be created through self-service. You will need to contact either the Microsoft or GitHub sales team. Please note that this account can only be paid for through an active Microsoft Azure subscription.
If you are planning to move to the full GitHub Enterprise Cloud in the near future, note that GitHub Copilot Business for Non-GHE (GHCBnonGHE) cannot be upgraded to a full GitHub Enterprise (GHE) account. Therefore, either start with a full GHE account now or prepare to migrate to a new account later.
Step-by-Step Guide
Steps 1 and 2: Azure Billing and Identity Provider (IdP) Configurations
The first two steps are exactly the same as configuring a GitHub Enterprise Cloud (GHEC) EMU account. Since I have already covered this in previous posts, please refer to the following guides:
- Step-by-step guide for Azure billing configuration
- Step-by-step guide for IdP configuration with Microsoft Entra ID (SAML)
For GHCBnonGHE with Entra ID, I recommend to use SAML instead of OIDC. Since each Entra ID tenant is limited to one GitHub OIDC integration, it’s best to keep OIDC available in case you subscribe to a full GitHub Enterprise Cloud EMU account in the future.
While it is common to use the same Microsoft Entra ID tenant for both billing and identity configuration, it is not a requirement. Billing and IdP configurations are managed through separate Microsoft Entra ID Enterprise Applications. Refer to this diagram for visual clarification:
graph LR
    subgraph "GitHub"
        A[Billing]
        B[Identity Provider #40;IdP#41;]
    end
    subgraph "Microsoft Entra ID Tenant B"
        subgraph "Enterprise Applications"
            C[GitHub Subscription Permission Validation]
        end
        C --- E[Azure Subscription]
    end
    subgraph "Microsoft Entra ID Tenant A"
        subgraph "Enterprise Applications"
            D[GitHub Enterprise Managed User]
        end
    end
    A --- C
    B --- D
GHEC EMU: Initial Configuration Diagram
Step 3: Create Enterprise Teams in GitHub
- Go to
https://github.com/enterprises/{enterprise_slug} - Login with a GitHub Enterprise Owner account
- Go to People → Enterprise teams
- Click New enterprise team
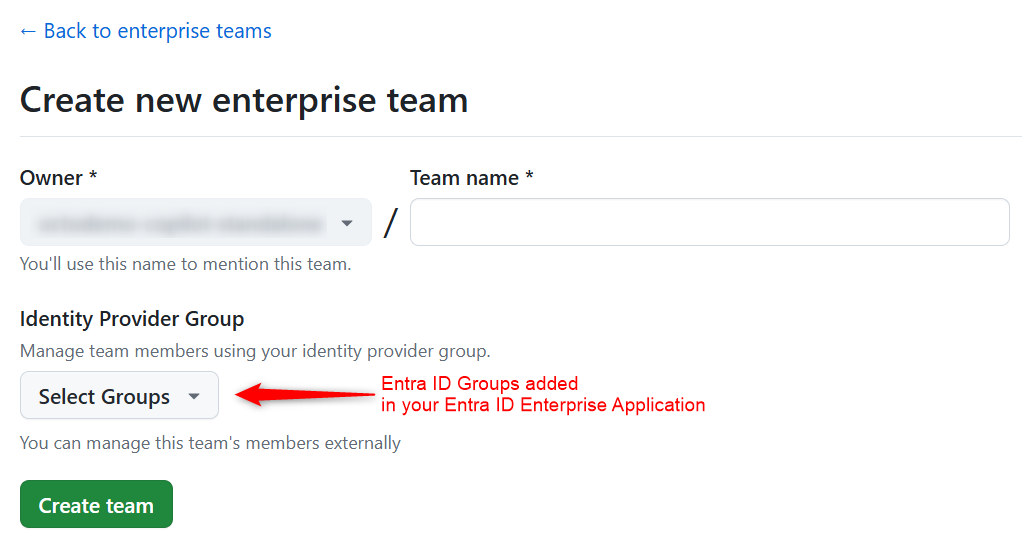
- Repeat step 4 for each team that you want to create.
If you want teams to be synchronized with your Entra ID group, go back to the Azure Portal → Enterprise Applications and add the groups that you want to synchronize.
Do you need more than one team? Not necessarily. Creating multiple teams is primarily useful for team-level Copilot usage analytics. If you don’t need that, you can create a single team and add all users to it.
Step 4: Assign Copilot Licenses to Enterprise Teams
- Go to Settings → Enterprise licensing
- On the right of Copilot Business, click Manage seats

- Click Add teams and add the team that you just created
By assigning Copilot licenses to teams, your Azure subscription will be charged for each user in those teams.
The dollar ($x) amount displayed on this page is based on web prices. The actual amount billed will depend on the rates (e.g., enterprise discounts) in your Azure subscription.
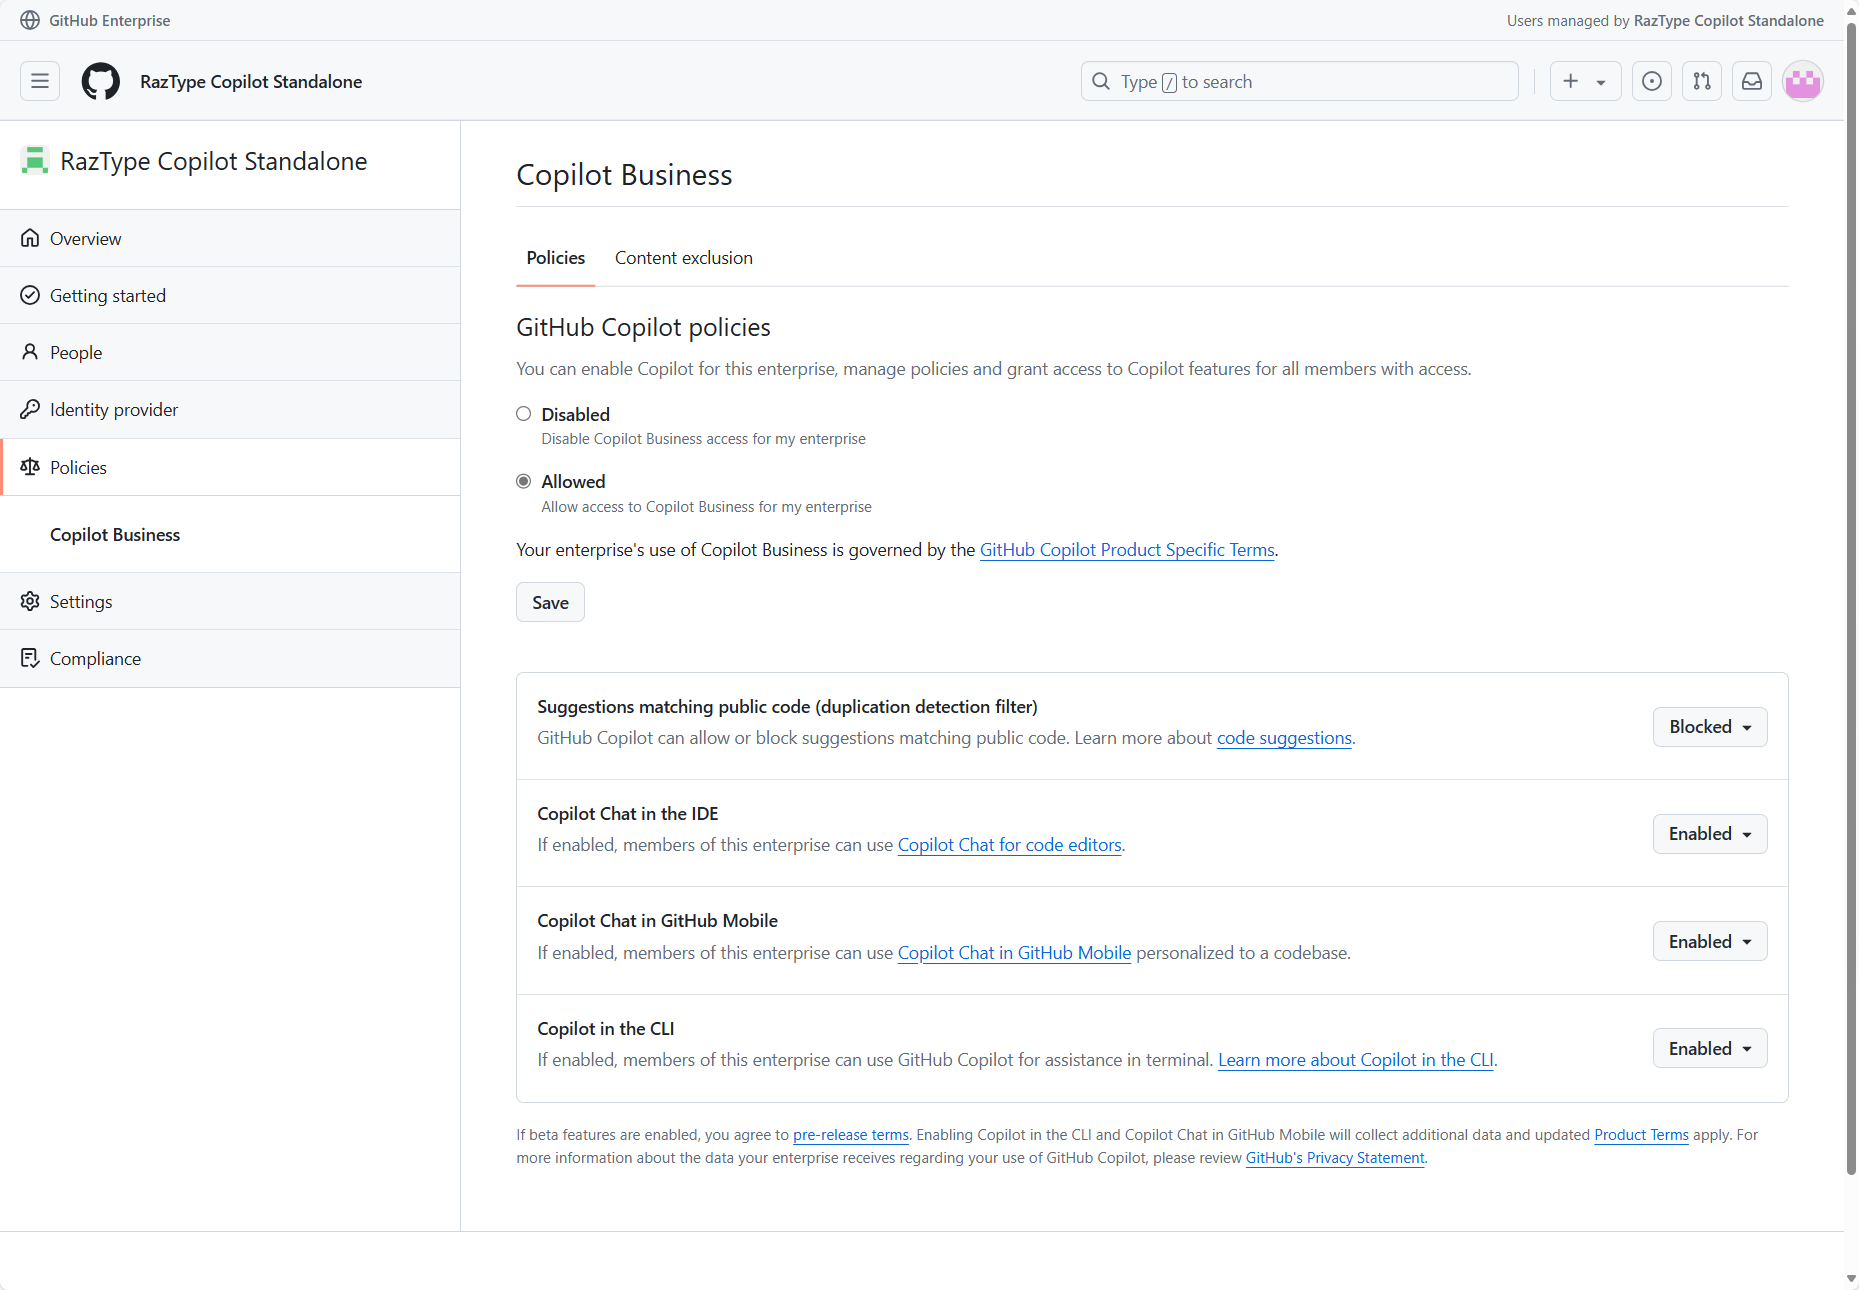
Step 5: Enable Copilot and Configure Policies
- Go to Settings → Policies → Copilot Business
- In the Policies tab, under GitHub Copilot Policies, select Allowed and then Save
- Enable/Disable the other policies as needed (see here for more info). Here’s an example of a typical enterprise configuration:
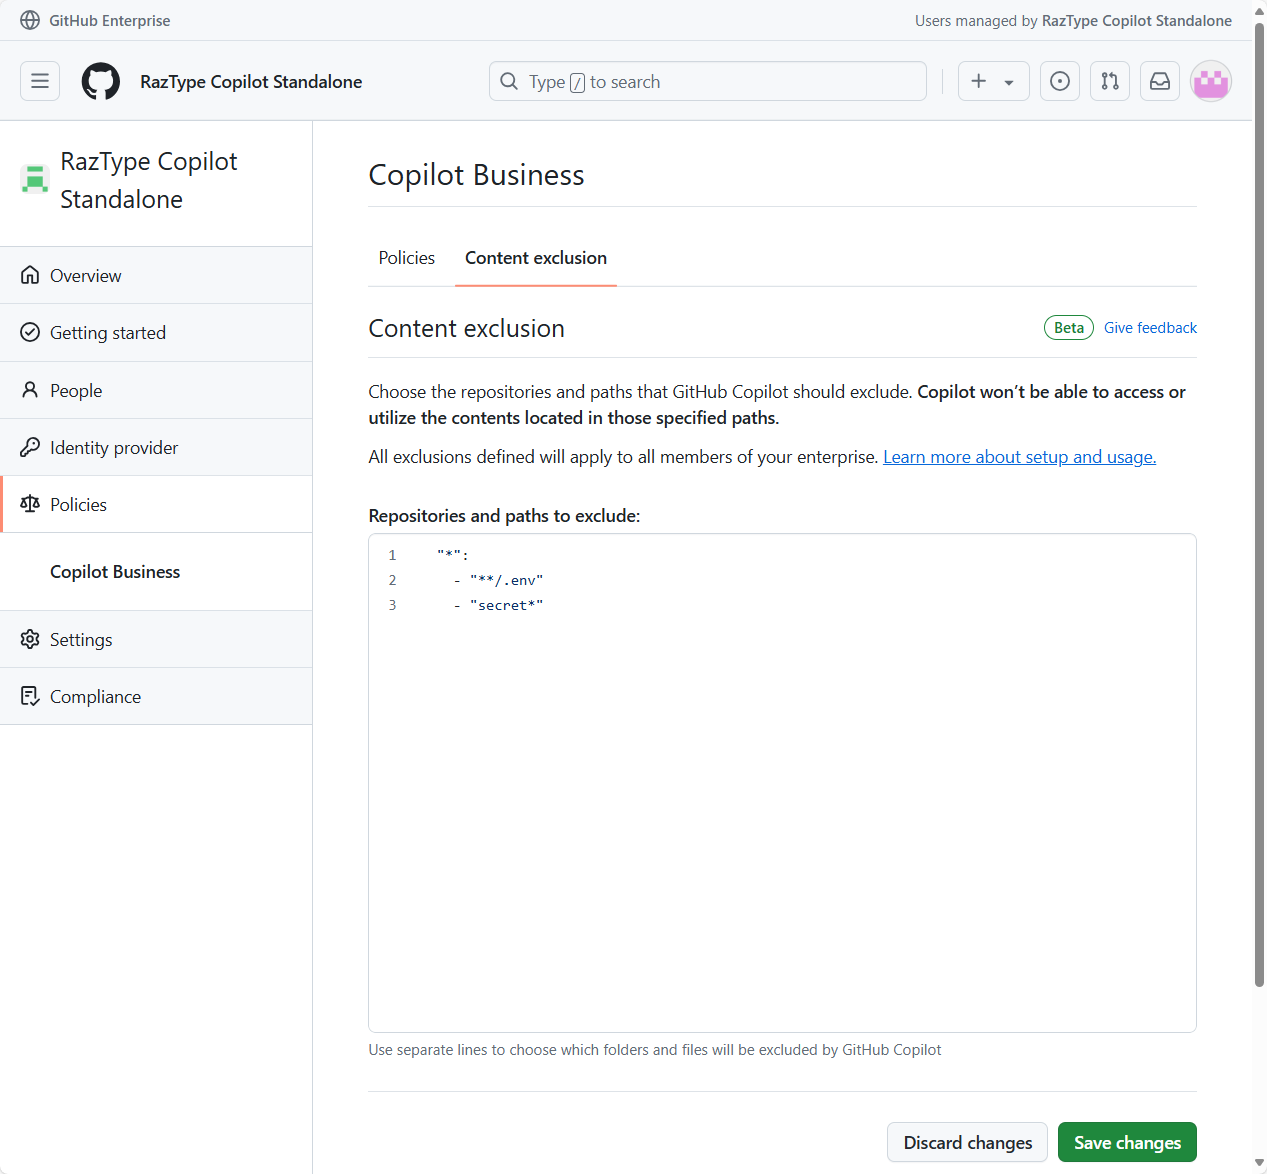
- Click the Content exclusion tab and configure the repositories and paths that you want GitHub Copilot to exclude. Also, check out the documentation for this policy.
Congratulations! You have completed the admin setup. The next step is to confirm that your developers can start using GitHub Copilot.
Quick reminder: GitHub Copilot Business is a purely IDE-based experience. Only your administrators need access to
https://github.com/enterprises/{enterprise_slug}, so you don’t have to share this URL with your developers.
Step 6: Test your Configuration with a Developer
Here’s a quick guide on what a developer needs to do to start using GitHub Copilot:
- Install the GitHub Copilot Extension in your IDE
- Sign in to GitHub
- Login with your username^ (NOT your email address!)
- Start using GitHub Copilot
^This is where it gets tricky! Each developer will need to know their GitHub
{alias}_{shortcode}username.
{alias}is, by default, the email prefix of your IdP username - but reformatted to only alphanumeric characters or single hyphens (Note: This default username mapping logic can be customized, check this out for Entra ID).{shortcode}is the enterprise shortcode created during the GHCBnonGHE account creation. The shortcode is the same as the prefix of your root admin account{shortcode}_admin.
Here are some examples, assuming your enterprise shortcode isrt:- If the IdP username is
john.doe@raztype.com, then the GitHub username isjohndoe_rt.- If the IdP username is
john_doe@raztype.com, then the GitHub username isjohn-doe_rt.- If the IdP username is
john-doe@raztype.com, then the GitHub username isjohn-doe_rt.- If the IdP username is
johndoe@raztype.com, then the GitHub username isjohndoe_rt.
If you are still stuck, ask your GitHub admin to go tohttps://github.com/enterprises/{enterprise_slug}/peopleand look up your username (it’s the gray text under your name).
Happy coding!