Increase Vibe Coding Accuracy with the Plan-Implement-Run Pattern
In the world of AI-assisted coding, getting agents to generate structured and predictable results can often feel like a challenge. Many developers rely on single-shot prompts, hoping their AI coding agents will deliver the perfect solution on the first try. While this can be a fun way to practice prompt engineering, it is often impractical for daily use.
In this post, I’m sharing a better approach: the Plan-Implement-Run Pattern. This simple 3-step methodology transforms chaotic “vibe coding” into a streamlined, effective workflow.
This is not a new concept but rather my attempt to articulate an observation from various implementations, including my own experiences.
- Since the early days of Semantic Kernel and LangChain, the idea of forcing AI to think step-by-step by first generating a plan before executing a task has been a common practice. This is something developers can learn from and apply effectively.
- GitHub Copilot Workspace generated a plan and asked for developer confirmation before proceeding with implementation. The more recent GitHub Copilot Coding Agent follows the same approach, except now the plan is included in the Pull Request.
- Cursor’s planning mode and Windsurf’s cascade adopt similar methodologies.
- Other blogs share comparable ideas but articulate them differently. A quick web search led me to Can AI Learn to Plan Before It Codes? and Why Planning Features with AI Before Coding Will Revolutionize Your Development Process.
Instead of relying on the AI coding agent to intuitively create a plan or waiting for specific AI coding products to improve their planning features, I’m sharing how you can take control and guide the agent to follow this approach effectively.
For the examples in this post, I am using GitHub Copilot with VSCode. If you are using a different coding agent or IDE, the concepts will still apply.
Pre-requisite: Markdown Documentation in Your Codebase
Think of the coding agent as a new hire that you’ll need to guide with very clear instructions. As with any new hire, you need to provide it with a wealth of information about your project, such as:
- The application overview
- The technology stack
- The specification documents
- The database schema
- The files and folder structure of the codebase
- The coding standards
- And more
The challenge here is figuring out how to give the coding agent access to all of this. I have found that having all this information in markdown documents saved in the docs/ folder of your codebase is the cleanest and most efficient way.
Note: If your documents are currently stored in other locations (e.g., SharePoint, Confluence, etc.), this transition might not be straightforward. Here are some suggestions to ease the process:
- Convert only the relevant documents to markdown; you likely won’t need everything. Tools like markitdown can help with this conversion.
- Use the
#fetchtool (or its equivalent) to extract information from public websites. This is particularly useful for public documentation.- Use or create your own MCP Server. For instance, Context7 is a recommended tool for retrieving the latest documents about your tech stack.
Here’s an example of a codebase file structure with markdown documentation:
1
2
3
4
5
6
7
8
9
10
11
12
13
14
15
16
17
18
19
20
21
22
23
24
25
26
27
28
29
30
31
32
33
34
35
36
37
# File Structure

This document outlines the complete file and folder structure of the Uy Kape project codebase.

It includes:
- A description of all the files in the `/` root directory
- A description of every root folder
- A description of all the files and subdirectories in the `docs/` folder

my-application/
├── .git/                           # Git repository metadata
├── .github/                        # GitHub configuration and workflows
│   ├── chatmodes/                  # GitHub Copilot custom agent chat modes
│   ├── instructions/               # AI agent prompt instructions based on file extension
│   ├── prompt-snippets/            # Reusable prompt snippets
│   │   └── coding-standards.md     # General coding standards
│   ├── prompts/                    # AI agent reusable prompts
│   │   ├── 1-plan.prompt.md        # AI agent prompt for creating a coding implementation plan
│   │   ├── 2-implement.prompt.md   # AI agent prompt for implementing a plan
│   │   └── 3-run.prompt.md         # AI agent prompt for running and fixing an implementation
│   ├── workflows/                  # GitHub Actions workflows
│   └── copilot-instructions.md     # AI agent system prompt
├── .gitignore                      # Git ignore rules
├── .vscode/                        # VS Code workspace configuration
│   └── mcp.json                    # Model Context Protocol configuration
├── docs/                           # Documentation
│   ├── plans/                      # Implementation plans generated by the coding assistant
│   ├── screens/                    # Screenshots and UI mockups
│   │   └── wireframe1.png          # Interface mockup
│   ├── specs/                      # Specifications and requirements
│   │   ├── architecture.md         # Application architecture
│   │   ├── db_schema.md            # Database schema
│   │   ├── initial_idea.md         # Initial project idea documentation
│   │   └── specifications.md       # Technical specifications
│   └── file_structure.md           # This file. Files and folder structure of this codebase
├── README.md                       # Project overview and setup instructions
└── src/                            # Source code directory
The above is an actual file structure for a personal project that I’m working on. See this changeset for the initial version of this project, before I started coding anything. (Note: Many folders are missing because Git doesn’t commit empty folders.)
As you can see from this structure, the idea is to document everything you want the coding agent to know in the docs/ folder. Then, inform the agent about the documents in this folder. To achieve this, include this instruction in the system prompt.
1
2
3
4
5
6
7
8
9
10
11
12
13
14
15
16
General Development Guidelines

## **CORE RULES**
### Reference Specific File Type Instructions
Check the files in `/.github/instructions/*.instructions.md` for any additional instructions based on the file you are working on. This **INCLUDES _NEW_** files that you are creating.
- Check each file in this folder and check `applyTo: '**/*.<extension>` to see which files the instructions apply to.
- For example, follow the instructions in `/.github/instructions/reactjs.instructions.md` for `**/*.jsx, **/*.tsx, **/*.js, **/*.ts, **/*.css, **/*.scss` files.

**REMINDER**: If you are creating a new file, follow the above instructions as you create this file. If you didn't, review the file and modify it to follow the instructions in the relevant `.instructions.md` file.

### File and Folder Structure
To know what each file and folder does, or to look for any project documentation information, refer to [file_structure](/docs/file_structure.md)

...
## Quality Standards
Follow [coding-standards](/.github/prompt-snippets/coding-standards.md)
The Plan-Implement-Run Pattern
Once the codebase is set up so that the coding agent knows where to find information about your application, we can now vibe code in 3 easy steps!
/1-plan implementation of the <feature/module>. Refer to the #file:initial_idea.md and #file:db.schema.md for this implementation./2-implement #file:<feature/module>.plan.md/3-run the <feature/module>
Of course, each reusable prompt needs to be written. Here are the details.
1. Plan
The first step is to use your AI coding agent to think deeply and generate an implementation plan.
1
2
3
4
5
6
7
8
9
10
11
12
13
14
15
16
17
18
19
20
21
22
23
24
25
26
27
28
29
30
31
32
33
34
35
36
37
38
39
40
41
42
43
44
45
46
47
48
49
50
51
52
53
---
description: "Plan for a coding implementation for an AI coding assistant to follow."
---
Your goal is to generate an coding implementation plan for an AI coding assistant to follow.
Create this plan in a new markdown .md file in `/docs/plans/<requirement_name>.plan.md`, for the requirement provided to you. You can decide on the appropriate requirement name.
For example, if the requirement name is "Implement User Authentication", the file should be created as `/docs/plans/user_authentication.plan.md`.

## RULES:
- Keep implementations simple, do not over architect
- Do not generate real code for your plan, pseudocode is OK
- For each step in your plan, include the objective of the step, the steps to achieve that objective, and any necessary pseudocode.
- Call out any necessary user intervention required for each step
- Consider accessibility part of each step and not a separate step

## Steps to Follow
### 1. FIRST
- Review the attached specification document to understand the requirements and objectives.
- If needed, use context7 to get the latest documentation of the technology stack (e.g., Supabase, React.js, Vite).

### 2. THEN
- Create a detailed implementation plan that outlines the steps needed to achieve the objectives of the specification document.
- The plan should be structured, clear, and easy to follow.
- Add a frontmatter to the implementation plan

```markdown
---
description: "Implementation plan for <requirement>"
created-date: YYYY-MM-DD
---

PLAN HERE
```

- Always add validation steps in your plan to ensure the implementation meets the requirements.
- Structure your plan as follows, and output as Markdown code block

```markdown
# Implementation Plan for [Spec Name]
- [ ] Step 1: [Brief title]
  - **Task**: [Detailed explanation of what needs to be implemented]
  - **Files**: [Maximum of 20 files, ideally less]
    - `path/to/file1.ts`: [Description of changes], [Pseudocode for implementation]
  - **Dependencies**: [Dependencies for step]

[Additional steps...]
```

### 3. NEXT:
- Validate and self-review your plan to ensure it meets the requirements and is ready for implementation.
- Iterate with me until I am satisifed with the plan

### 4. FINALLY:
- DO NOT start implementation without my permission.
Then, run the reusable prompt with GitHub Copilot Chat. For example:
/1-plan implementation of the Barista Admin Module - Menu Management. Refer to the #file:initial_idea.md and #file:db.schema.md for this implementation.
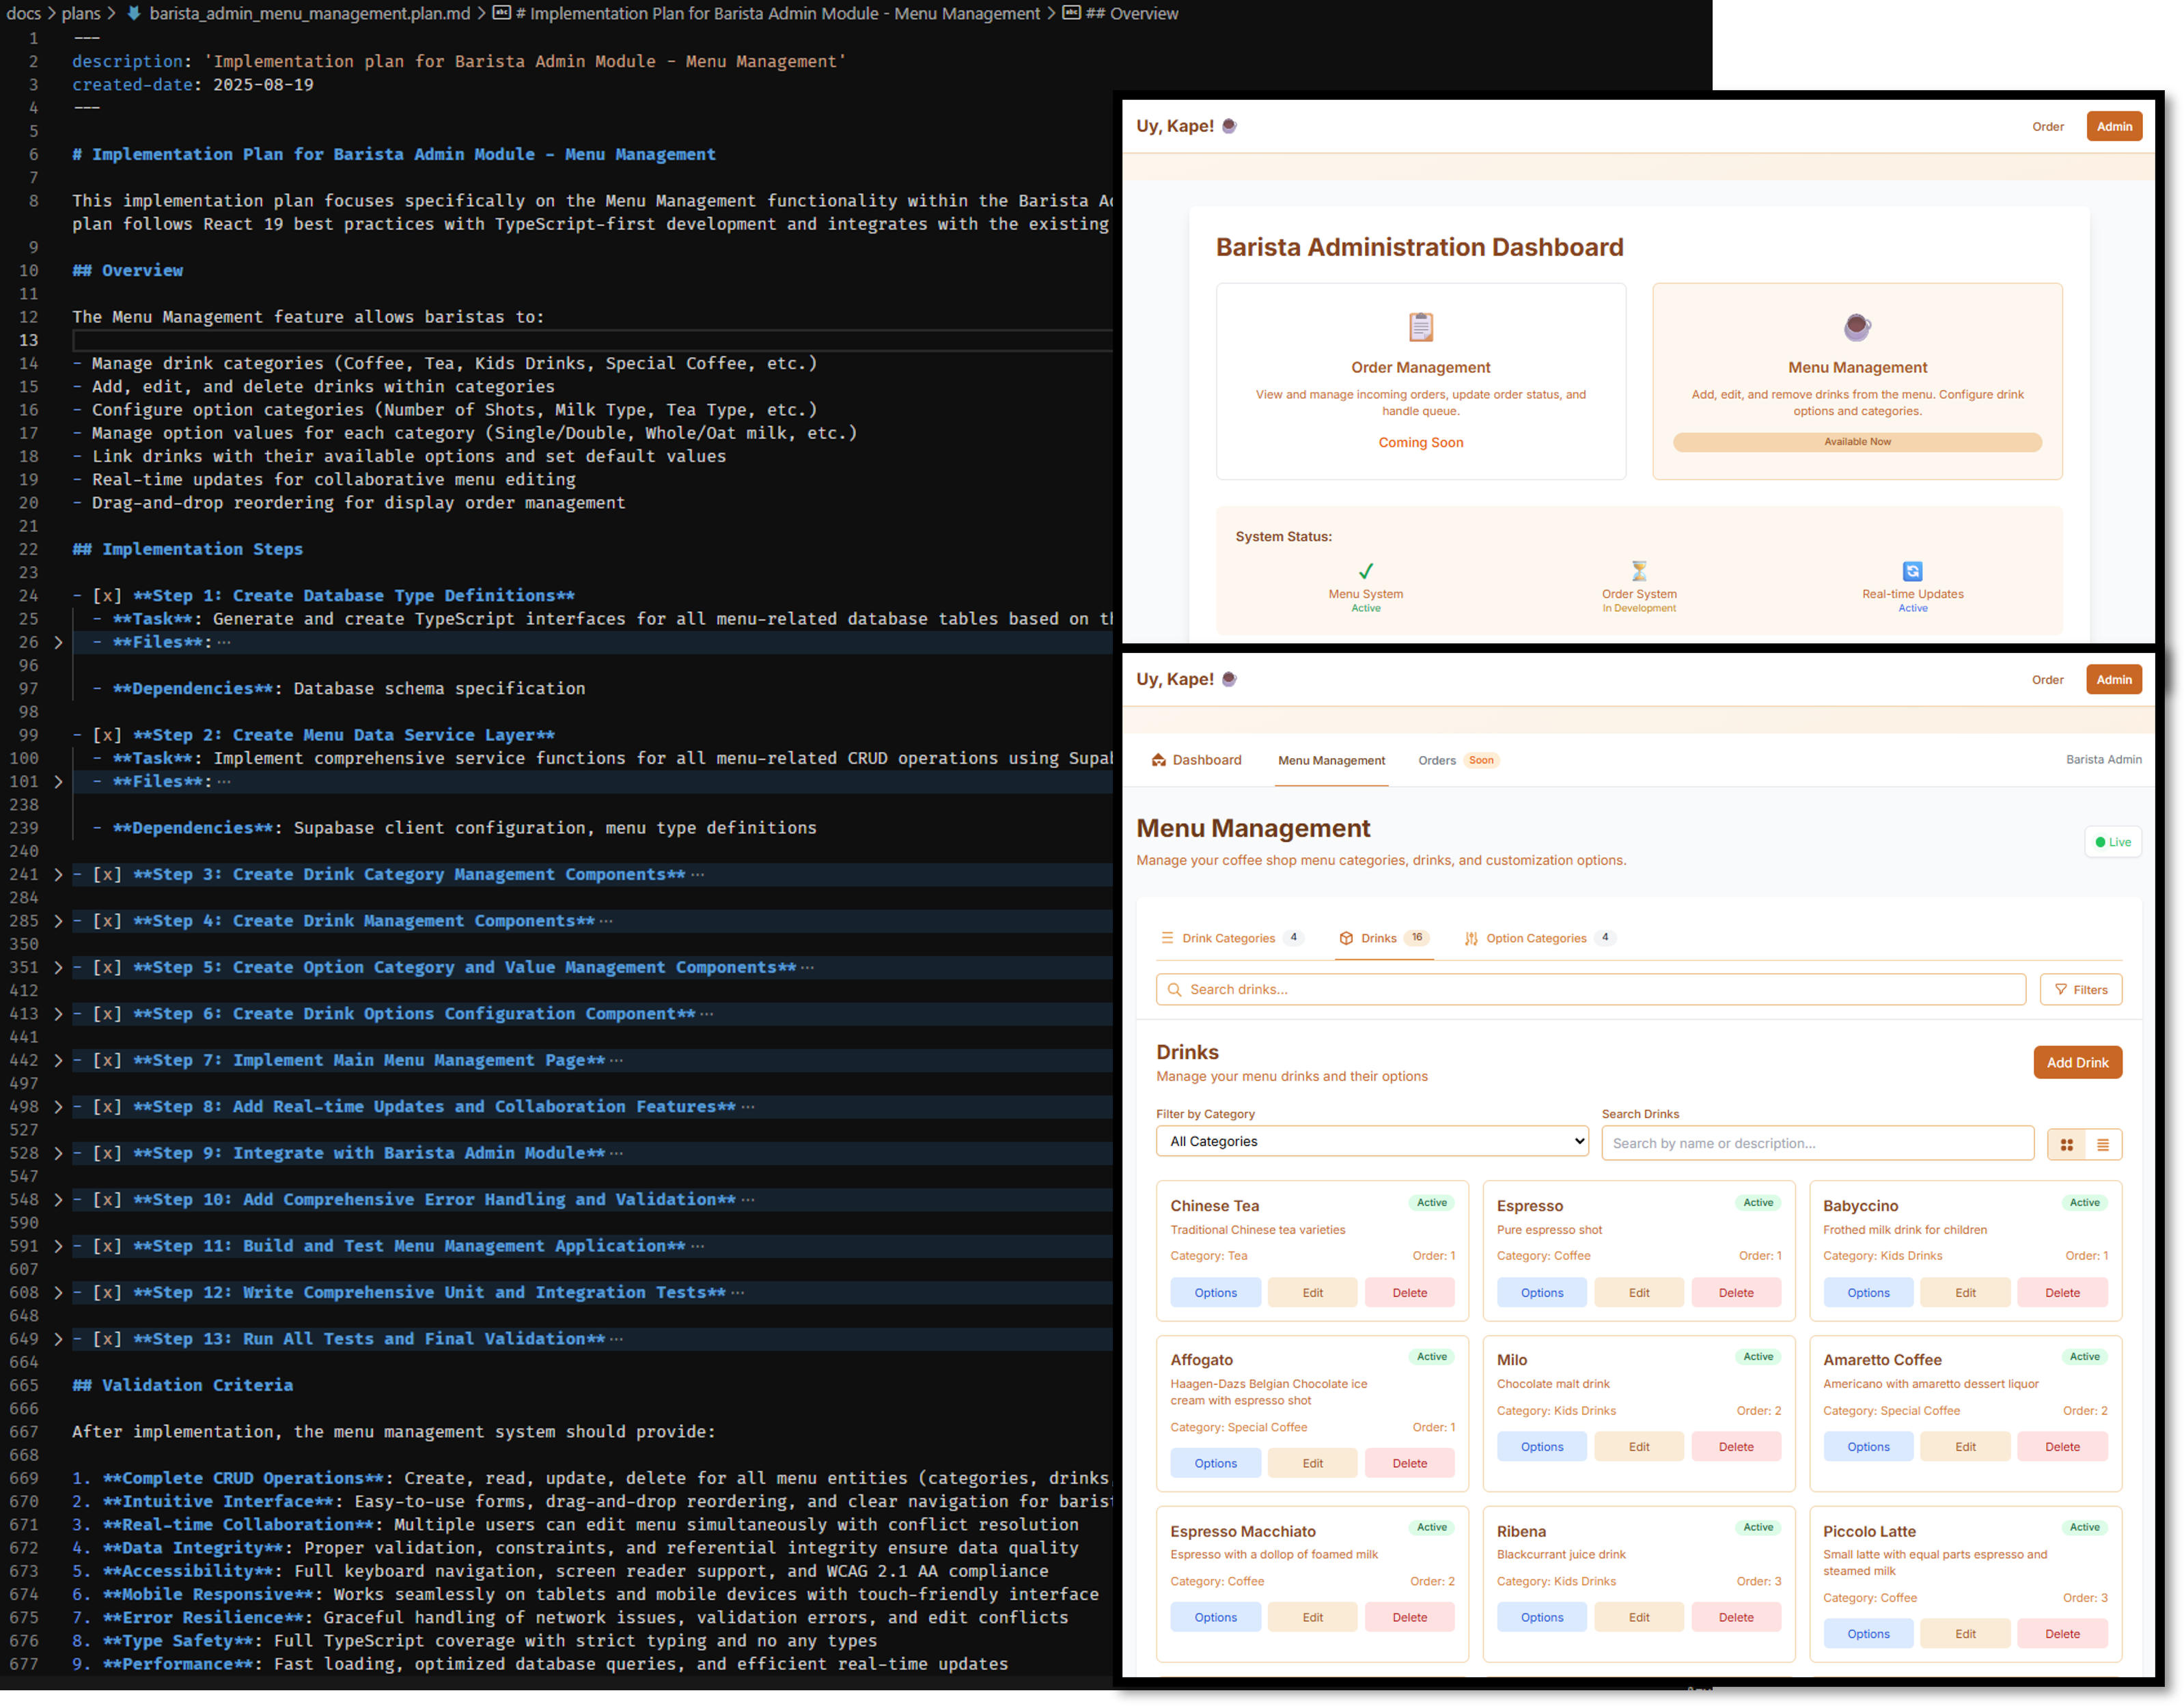
This will generate a new docs/plans/<feature>.plan.md document, like this:
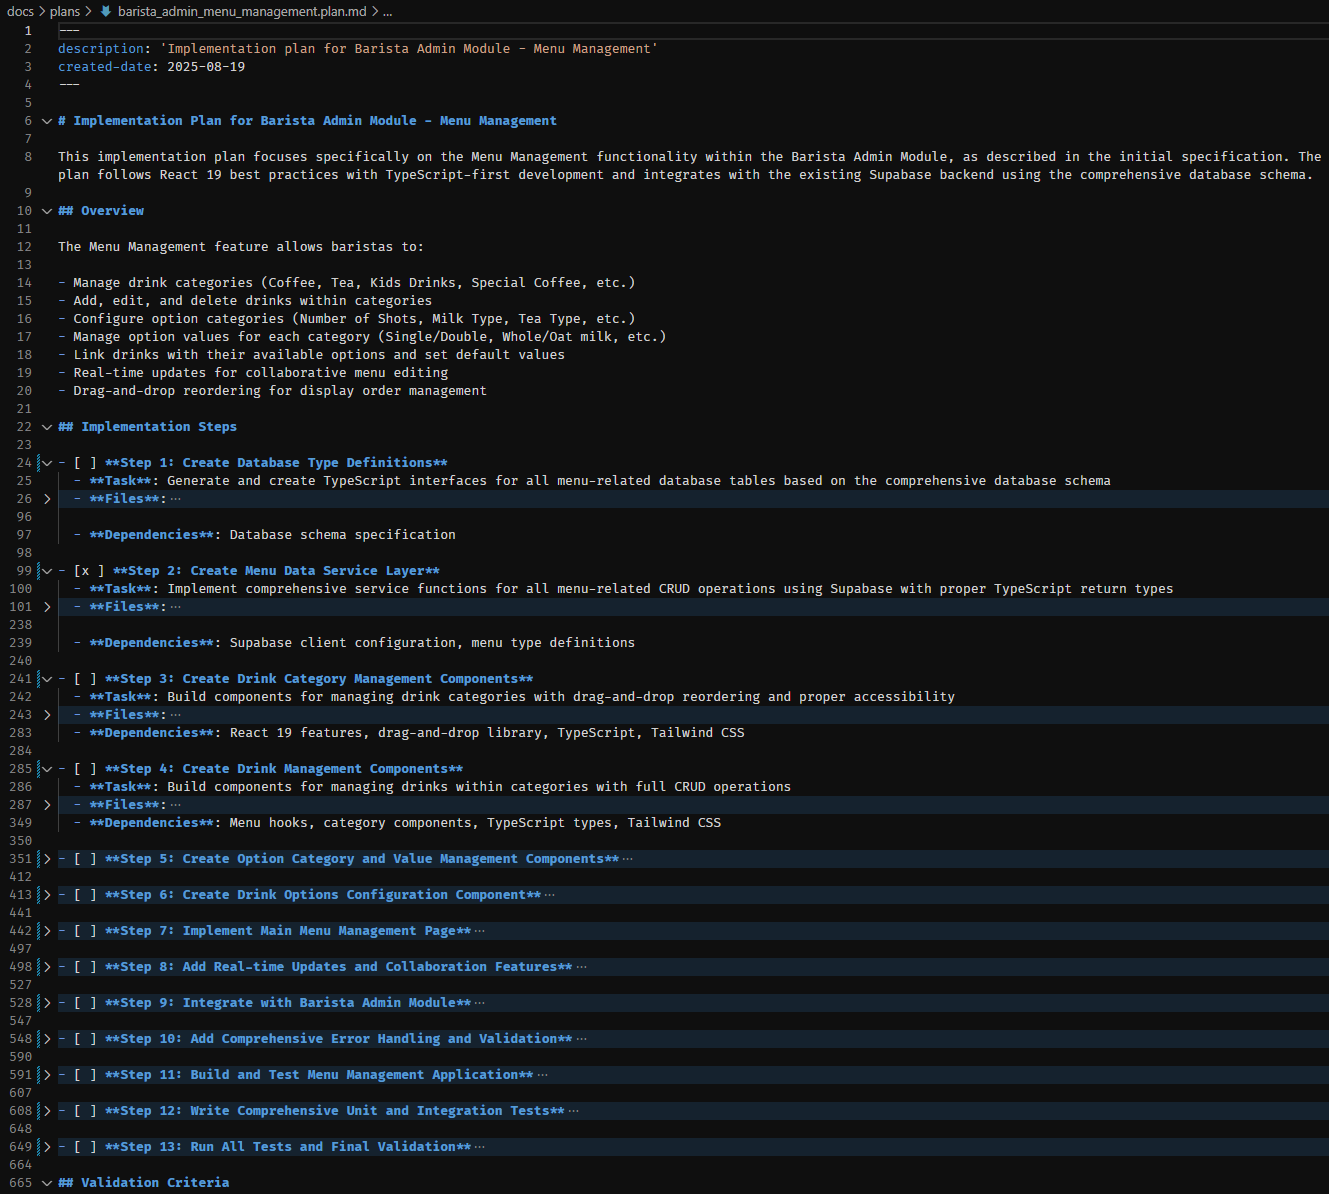 Output: Barista Admin Module - Menu Management - Implementation Plan
It’s always prudent to review the plan before implementation. However, in my experience, if the AI agent correctly references the technical documentation in the docs/ folder, these generated plans rarely require significant edits. Before coding assistants, we spent a lot of time thinking and planning before writing code. Now, we’re simply ensuring the AI coding agent follows the same disciplined approach.
2. Implement
The next step is straightforward: simply run /2-implement #file:OUTPUT_PLAN_HERE.md and watch the magic happen. Here’s my reusable prompt.
1
2
3
4
5
6
7
8
9
10
11
12
13
14
15
16
---
description: "Implement a plan step by step"
---

Your task is to implement each step of the provided plan, one at a time.

- The plan is just a suggestion to guide you in the right direction.
- You do not have to strictly follow it if it does not make sense.
- ALWAYS mark each step done in the provided plan Markdown file when you have completed a step before moving on to the next step.

Refer to [file_structure.md](/docs/file_structure.md) and check other implementations in the workspace to see how they are done. **DO NOT** make changes to the other files that you are only using for reference.

Implement and run the unit tests as described in the plan.
Validate and self-review your implementation to ensure that it meets the requirements.

Iterate with me until I am satisfied with the implementation.
3. Run
Finally, get your AI coding agent to run the application and address any issues that arise.
1
2
3
4
5
6
7
8
9
10
11
12
13
14
15
16
17
18
19
20
21
---
mode: "agent"
description: "Run the application locally and fix any errors encountered."
---

Your task is to run this application locally for functional testing.

- Before attempting to run the app, check if it is already running.

  - Use playwright to navigate to the default port.
  - If the app is not running, start the application and use playwright to navigate to the app again.
  - Be patient as it make take time for the application to start. Wait 10 seconds and attempt to access the app 3x before attempting to resolve any issue to get the application to run.

- When the app is properly running, use Playwright to navigate to the specified module/requirement to test if it is functioning correctly.
- Fix any issues that arise during the process.

Refer to the following to better understand the implementation done before fixing:

- Files and folder structure, located in `/docs/file_structure.md`
- Product specifications, located in `/docs/specs`
- Or any other relevant files in the `/docs` directory.
As shown above, the prompt will depend on the type of application you are building. For this web app example, it made sense to use the Playwright MCP server to assist with debugging. However, for other types of applications, the prompt could vary.
For instance, in this Terraform project, we useterraform planandterraform applyto deploy the module in a sandbox cloud environment for testing and debugging.
Conclusion
The Plan-Implement-Run pattern is a game-changing approach to development with AI coding agents. By adopting this methodology, you can transform chaotic, ad-hoc coding into a structured, predictable, and highly effective workflow. I hope you found this post helpful for your own projects. If you’re interested in exploring the latest code from my personal project, feel free to visit this repository.