Addressing Azure OpenAI Token Limitations (June 2023)
March 2024 Update: Although the methods in this post are still valid, the data is outdated. For the latest, please go here.
As with any service, Azure OpenAI has service quotas and limits, depending on which model you are using.
This is a summary of the current limits of the “famous” models (as of 2023-06-23):
| Model | Tokens per Request (TPR) | Tokens per Minute (TPM) |
|---|---|---|
| text-davinci-003 | 4,096 | 120,000 |
| gpt-35-turbo | 4,096 | 240,000 |
| gpt-4 (preview) | 8,192 | 20,000 |
| gpt-4-32k (preview) | 32,768 | 60,000 |
*To learn more about what tokens are, see OpenAI’s Tokenizer.
To add to the complexity, OpenAI-infused applications often make multiple requests to at least two models per query. For example, the Azure OpenAI + Enterprise Search demo makes two OpenAI requests per query (one for rephrasing the message to a search query using text-davinci-003, and another for answering the question using gpt-35-turbo). In other implementations, a running summary of the chat history can be maintained, increasing it to three OpenAI requests per query.
Putting it simply, if every user message at peak load requires at least 2 requests to text-davinci-003 x 4000 tokens. Then the peak load application limits will only be 15 user messages per minute.
In this article, I’m sharing how to address and manage these limits. There are two sections, depending on your role:
- How application developers can handle token limits
- How infrastructure engineers can handle token limits
How application developers can handle token limits
When it comes to token management, one of the main objectives of application developers is to minimize the prompt string to the least # of characters possible, as this translates to the # of tokens used.
For example: If your use case is similar to the Azure OpenAI + Enterprise Search demo, then this means minimizing the # of search results that you inject in the prompt.
Assuming that’s done, the other things to manage are Conversation History and Error Handling. Let’s discuss each one.
Conversation History Token Management
Windowed Conversations
How many conversations (user queries + response) do you need the application to remember? The longer the conversation memory, the higher the tokens used per request.
One of the strategies is to keep a running window of the latest k conversations. For example, in LangChain, you can use the ConversationBufferWindowMemory and do something like:
1
2
3
4
5
6
7
8
9
from langchain.llms import OpenAI
from langchain.chains import ConversationChain
conversation_with_summary = ConversationChain(
    llm=OpenAI(temperature=0),
    # We set a low k=2, to only keep the last 2 interactions in memory
    memory=ConversationBufferWindowMemory(k=2),
    verbose=True
)
conversation_with_summary.predict(input="Hi, what's up?")
Summarized Conversations
Another approach is to keep a running summary of the conversation, with a specified max # of tokens.
- Pro: Maintain a summary of the entire conversation, always.
- Con: A completion request to the model is needed to summarize. While this helps keep your prompt within TPR limits, it will affect TPM limits.
Also note that not summarization is not helpful for all use cases. Take a food recipe application for example, a user would normally prefer the detailed step-by-step recipe than a 3-sentence summary.
Combination of Windowed Conversations and Summary
You can also combine both approaches, that is to keep a running window of the latest k conversations, while maintaining a summary of the entire conversation.
How you implement this is up to you. LangChain has something called ConversationSummaryBufferMemory which can do this somewhat. However, you don’t specify the last k conversations but instead specify the MAX_TOKENS that it should keep in memory. It will be great if someone contributes a new ConversationSummaryBufferWindowMemory class in the future.
Make everything Configurable
There are lots of parameters to play with here:
- The
max_tokensof the model response, - The
kmessages conversation window or themax_tokensof the conversation buffer, and - The
max_tokensof the conversation summary
Not to mention other parameters depending on your use case.
Error Handling
The main error codes to handle are HTTP 429 and 503 (also see full list here). These errors can be handled by:
- Retrying a few times up to a minute (i.e. retry every 10 seconds, up to 60 seconds)
- Sending a user-friendly error message to try again (“Sorry, something went wrong, please try again.”)
- Sending a user-friendly error message that you are restarting the conversation (to clear the conversation history and shorten your prompt)
- Also consider proactively checking the
total_tokensreturned by the completion/chat completion API. Clear the conversation history if it is near the TPR limits.
How Infrastructure engineers can handle token limits
If you are an architect designing the infrastructure or an engineer who has the admin/contributor to Azure, your job is to figure out how to increase the token limits (or keep it limited according to your project budget). This section is about increasing the Tokens per Minute service limit.
Maximize Model Deployment TPM
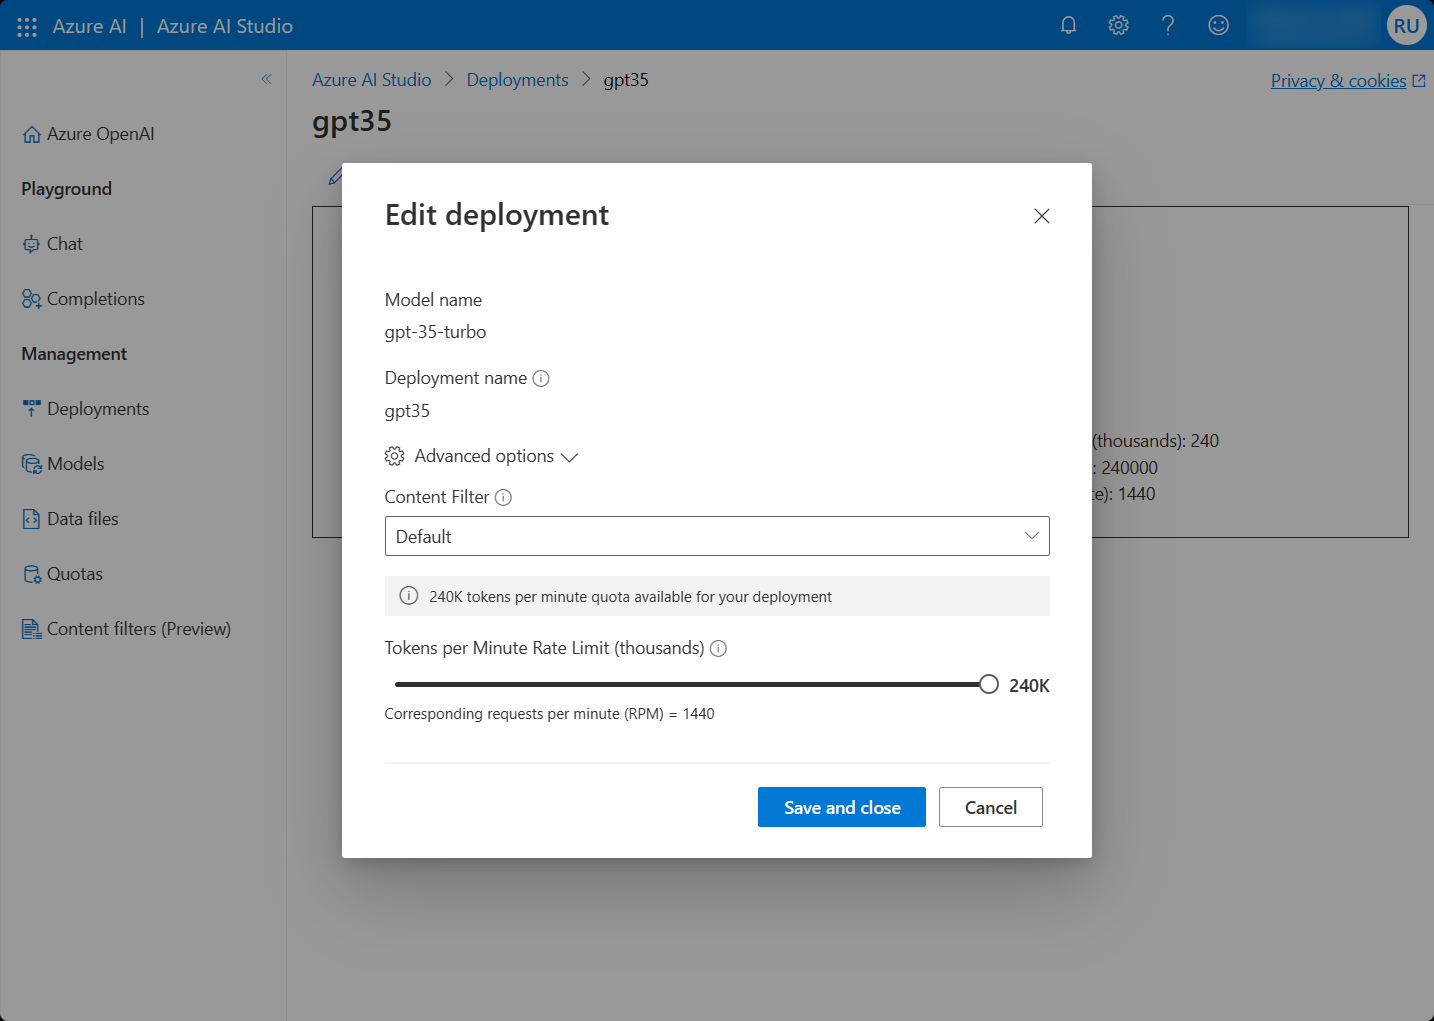
First, the TPM of each model deployment can be adjusted from the Azure OpenAI Studio. Go to Deployments and edit the model deployment. You should see the following under Advanced Options.
This brings your deployment to the maximum specified in the documentation. If this is enough for your use case, then your work is done. If not, read on…
Load Balance across Multiple Region Deployments
This is where it gets interesting. You are not restricted to provision a single Azure OpenAI resource. Azure OpenAI is available in five regions. You can provision an Azure OpenAI resource on each one and configured to the maximum TPM.
By creating a load balancer that fronts all Azure OpenAI resources, you can bring the maximum TPM to the following limits, per Azure subscription.
| Model | Tokens per Request (TPR) | Tokens per Minute (TPM) per Region per Az Sub. | Regions Available | Load Balanced TPM per Az Subscription |
|---|---|---|---|---|
| text-davinci-003 | 4,096 | 120,000 | East US, West Europe | 240,000 |
| gpt-35-turbo | 4,096 | 240,000 | All 5 regions | 1,200,000 |
| gpt-4 (preview) | 8,192 | 20,000 | East US, France Central | 40,000 |
| gpt-4-32k (preview) | 32,768 | 60,000 | East US, France Central | 120,000 |
Tips and implications for provisioning this properly
- Use the same deployment name for every resource (i.e. if you’re using “chat” for your
gpt-35-turbodeployment, use “chat” for every region)- If you have virtual network requirements, you’ll have to configure this for every region (private endpoints and maybe vnet peering per region.)
While this sounds simple, the main challenge is that each Azure OpenAI resource will have a different API key. Here are two general ways on how to abstract this problem from the application.
Method 1: Azure Front Door or Application Gateway
The simplest and key-less solution is to use Azure Managed Identities together with an Azure Application Gateway or Front Door.
2023-07-25 Update: Microsoft Azure has a few different load balancing services. In my tests, I was able to successfully implement Azure Application Gateway as the load balancing solution. However, my tests using the these services will NOT work for the following reasons:
- Azure Load Balancer: Private endpoints in the backend pool is not supported.
- Azure Traffic Manager: SSL offloading is not supported. Below is the error I have received in my attempt.
APIConnectionError: Error communicating with OpenAI: HTTPSConnectionPool(host='razopenai-tm.trafficmanager.net', port=443): Max retries exceeded with url: /openai/deployments/gpt35/chat/completions?api-version=2023-03-15-preview (Caused by SSLError(CertificateError("hostname 'razopenai-tm.trafficmanager.net' doesn't match either of '*.cognitiveservices.azure.com', '*.api.cognitive.microsoft.com', '*.dev.cognitive.microsoft.com', '*.openai.azure.com'")))
With Azure Managed Identities (MI), the application can use Azure AD to authenticate access to the Azure OpenAI resource. With this, it does not matter which resource the load balancer directs the application to, the application will be authorized to use the service.
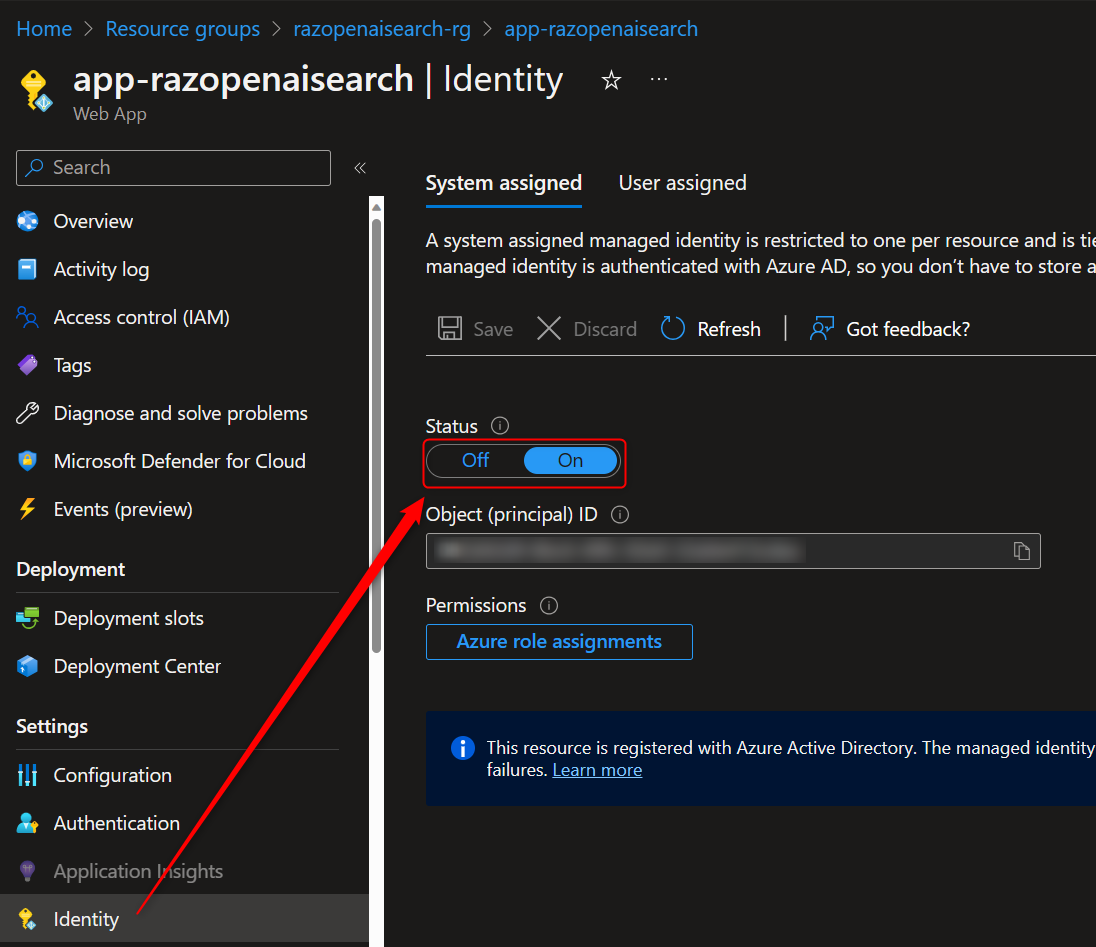
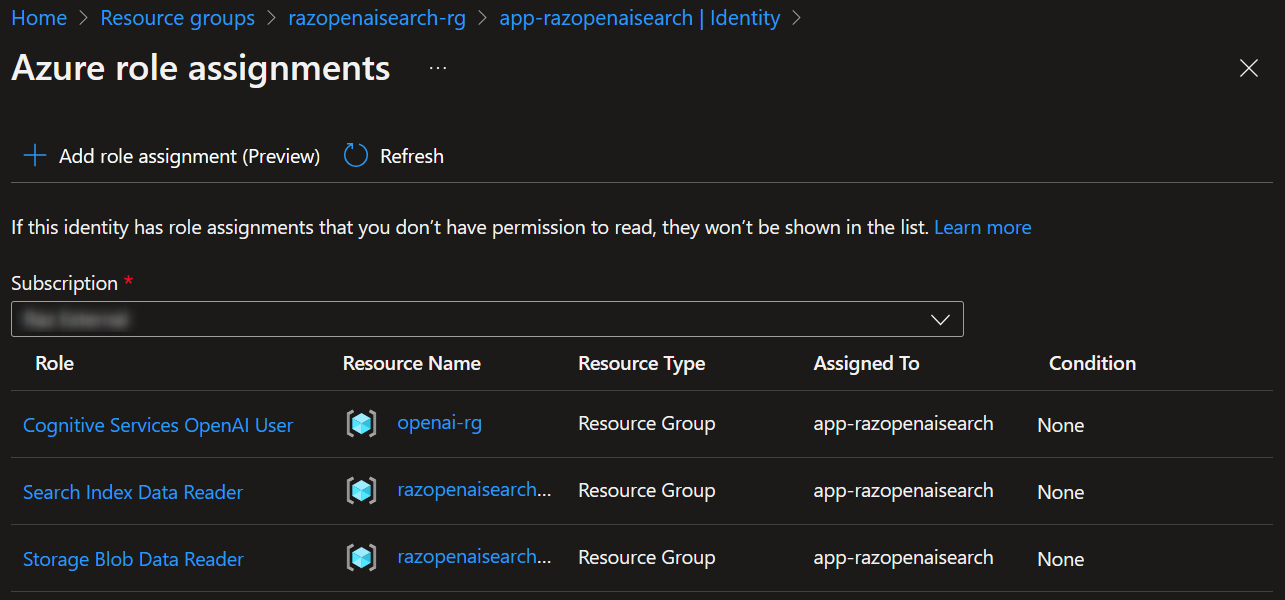
The Azure OpenAI + Enterprise Search demo uses this method, minus the load balancer. You will see in the screenshots below that MI is enabled for the App Service and is given the Cognitive Service OpenAI User role to the resource group of the Azure OpenAI resource.
Of course, this implies that the application should be deployed to an Azure service that supports Managed Identities. Yes, you can also use Azure AD Service Principals, but why have to deal with service principal client secrets?
And this is the code from the demo, no keys!
1
2
3
4
5
6
7
8
9
10
11
12
13
14
15
from azure.identity import DefaultAzureCredential
azure_credential = DefaultAzureCredential()

openai.api_type = "azure_ad"
openai_token = azure_credential.get_token("https://cognitiveservices.azure.com/.default")
openai.api_key = openai_token.token

# Set up clients for Cognitive Search and Storage
search_client = SearchClient(
    endpoint=f"https://{AZURE_SEARCH_SERVICE}.search.windows.net",
    index_name=AZURE_SEARCH_INDEX,
    credential=azure_credential)
blob_client = BlobServiceClient(
    account_url=f"https://{AZURE_STORAGE_ACCOUNT}.blob.core.windows.net",
    credential=azure_credential)
Method 2: Use Azure API Management
Another approach is to use Azure API Management (APIM). APIM is a full solution that allows organizations to secure and manage its APIs across Azure, other clouds, and on-premises. For our purposes in this article, we can use APIM to manage five different OpenAI endpoints and API keys and create a unique key for each application or team using the API. This offers the following advantages:
- The application only needs to remember a single API key for all the APIs that it is using (not limited to Azure OpenAI!)
- Cloud admins can monitor API usage per application.
- Not to mention, better security for your APIs.
- And, you can use LangChain. 😄
In using LangChain, the request authorization header is changed from
api-keytoOcp-Apim-Subscription-Key. The sample code will look like this:
Need even more Tokens per Minute?
If you need even more TPM than what is on this table, you can create more Azure subscriptions and use Azure APIM to load balance across all the Azure OpenAI resources in all these subscriptions (e.g. 3 Azure subscriptions x 5 Azure OpenAI resources each!)
Here’s an example of how I configured Azure APIM to load balance across five Azure OpenAI resources.
Step 1: Configure the Backends
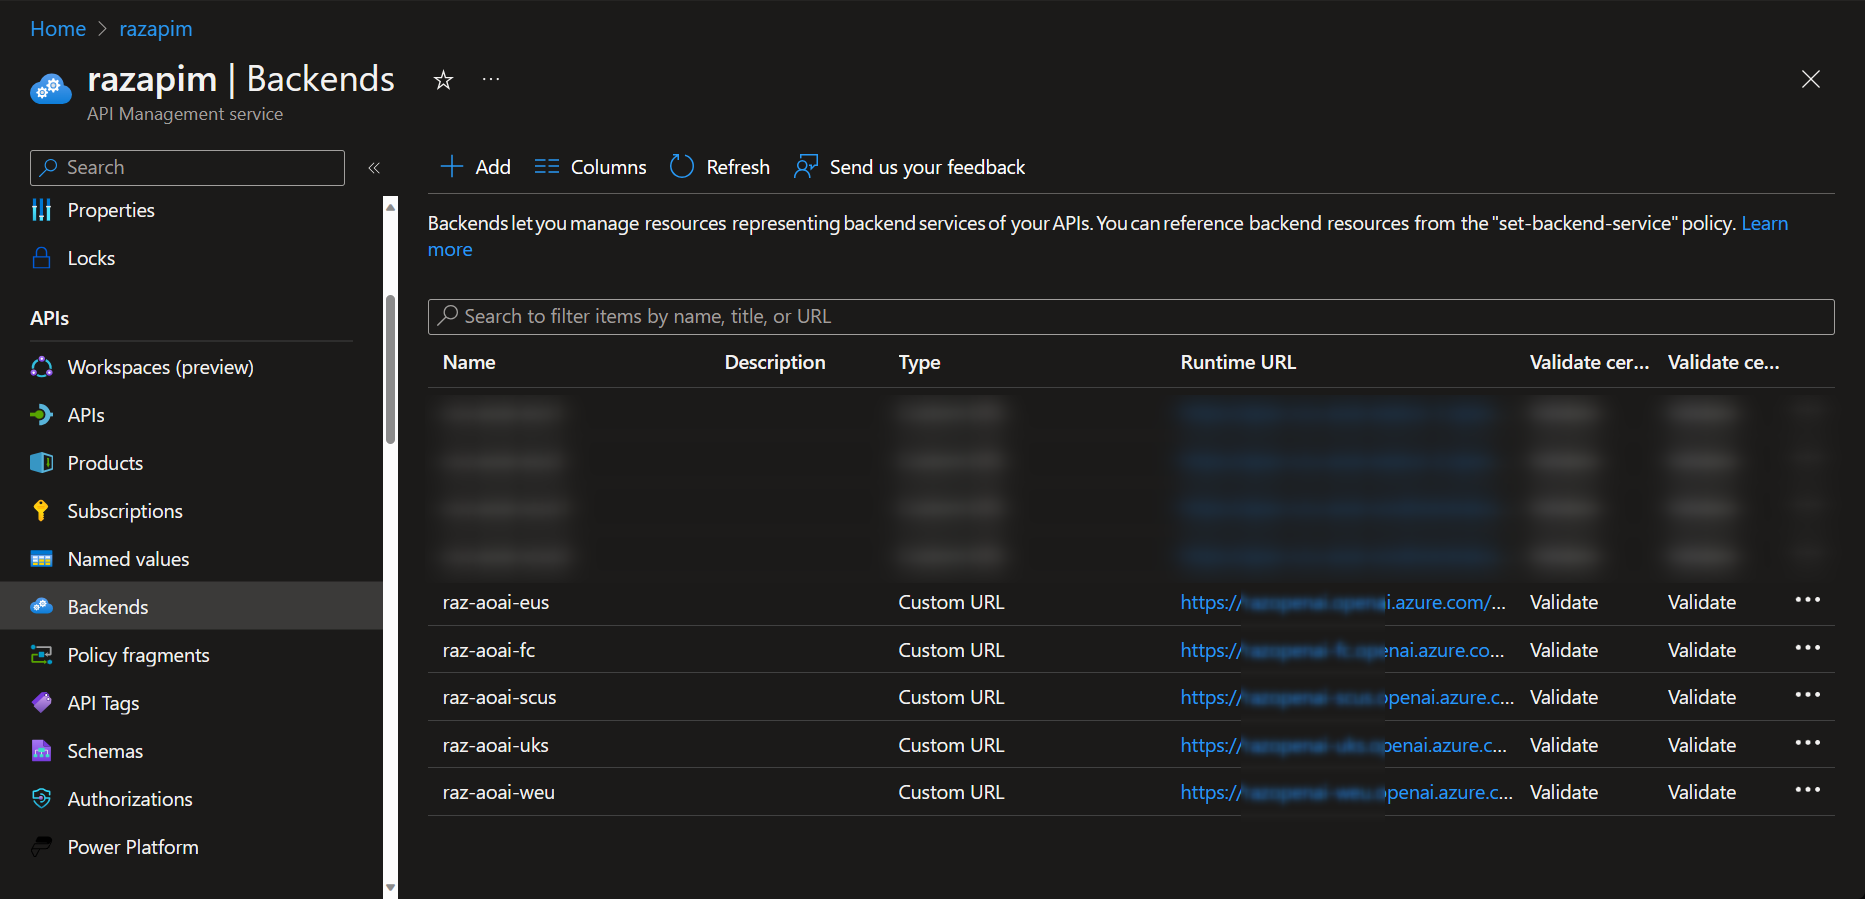 Azure API Management - Backends
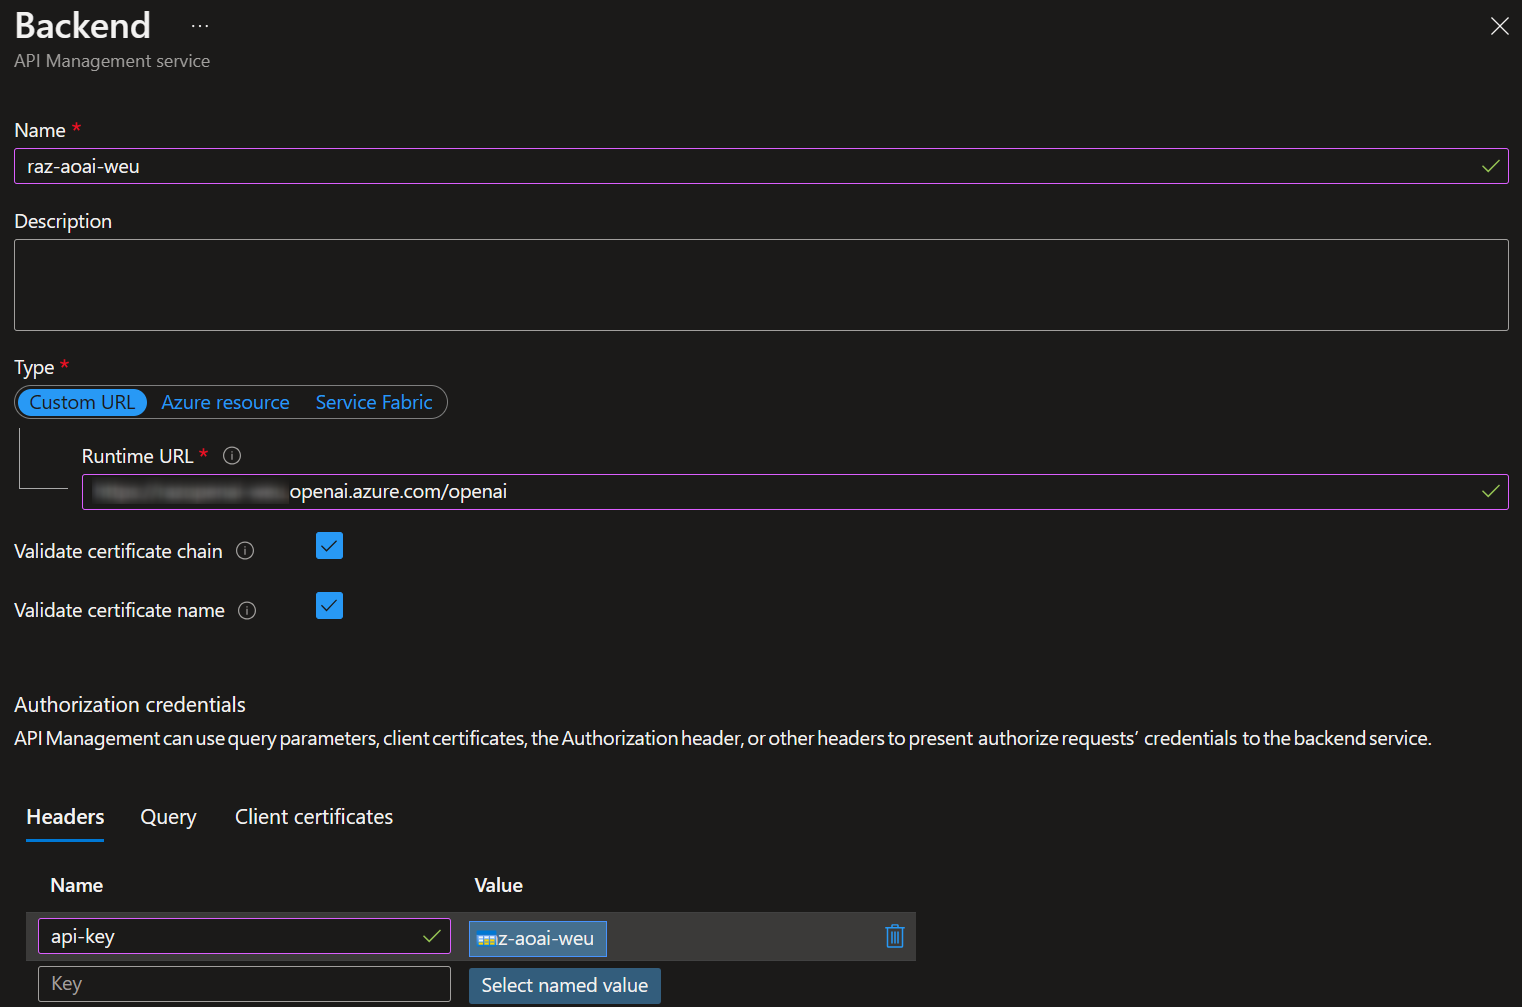 Azure API Management - Backends Configuration
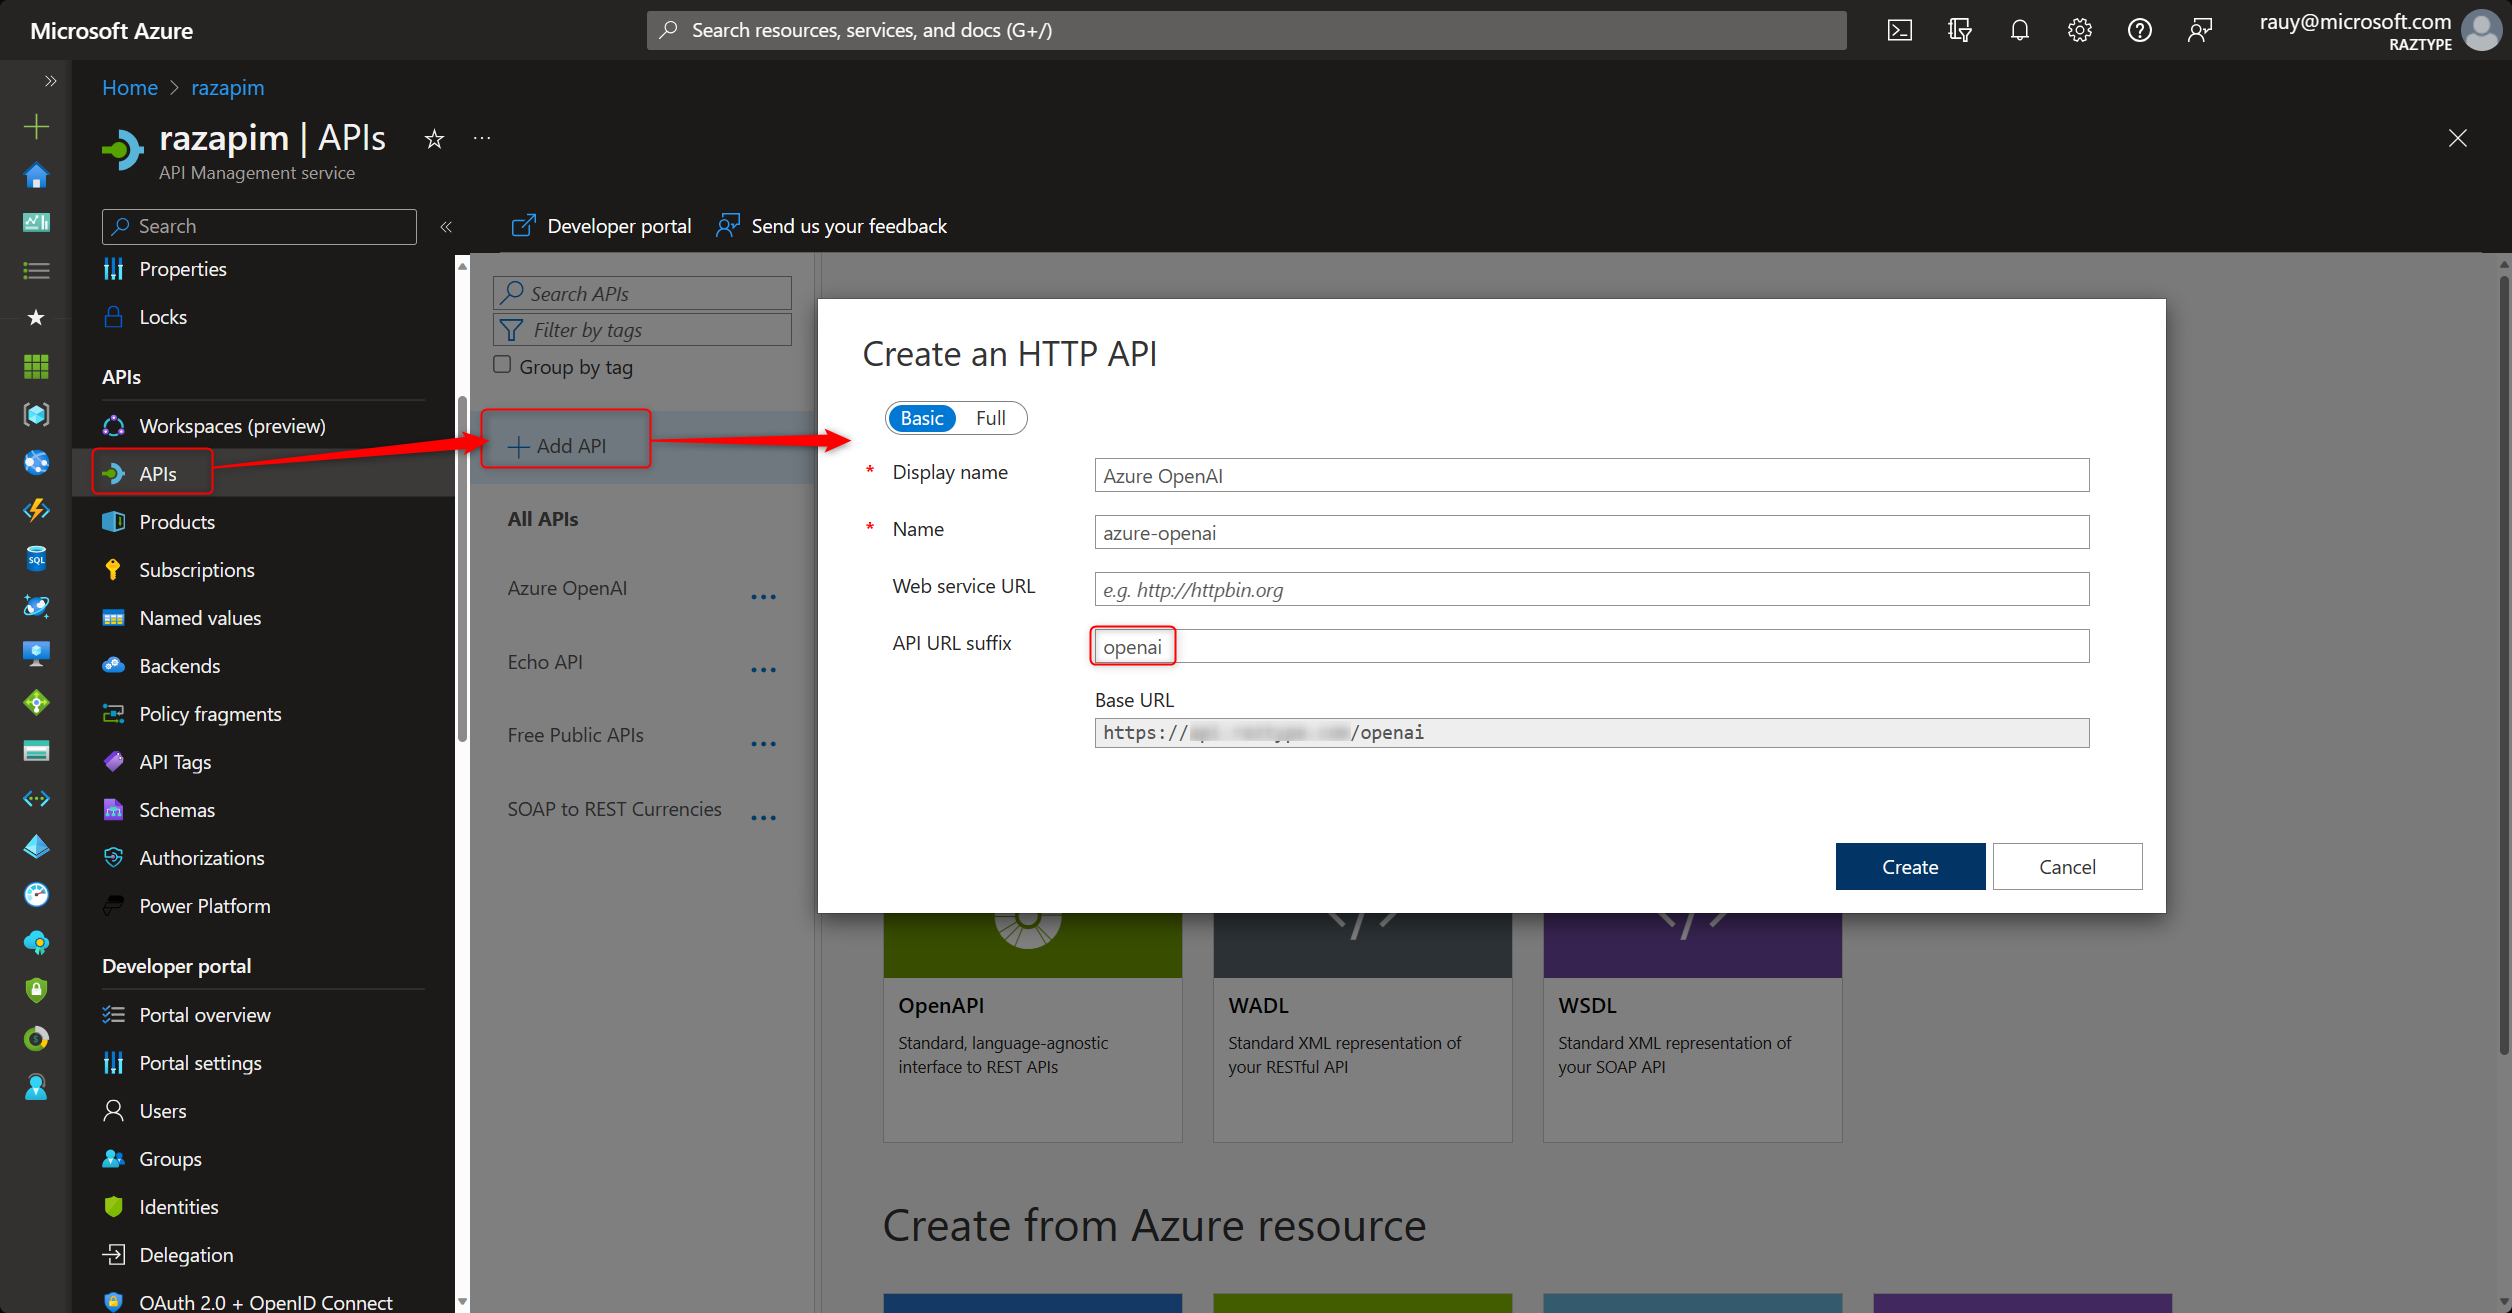
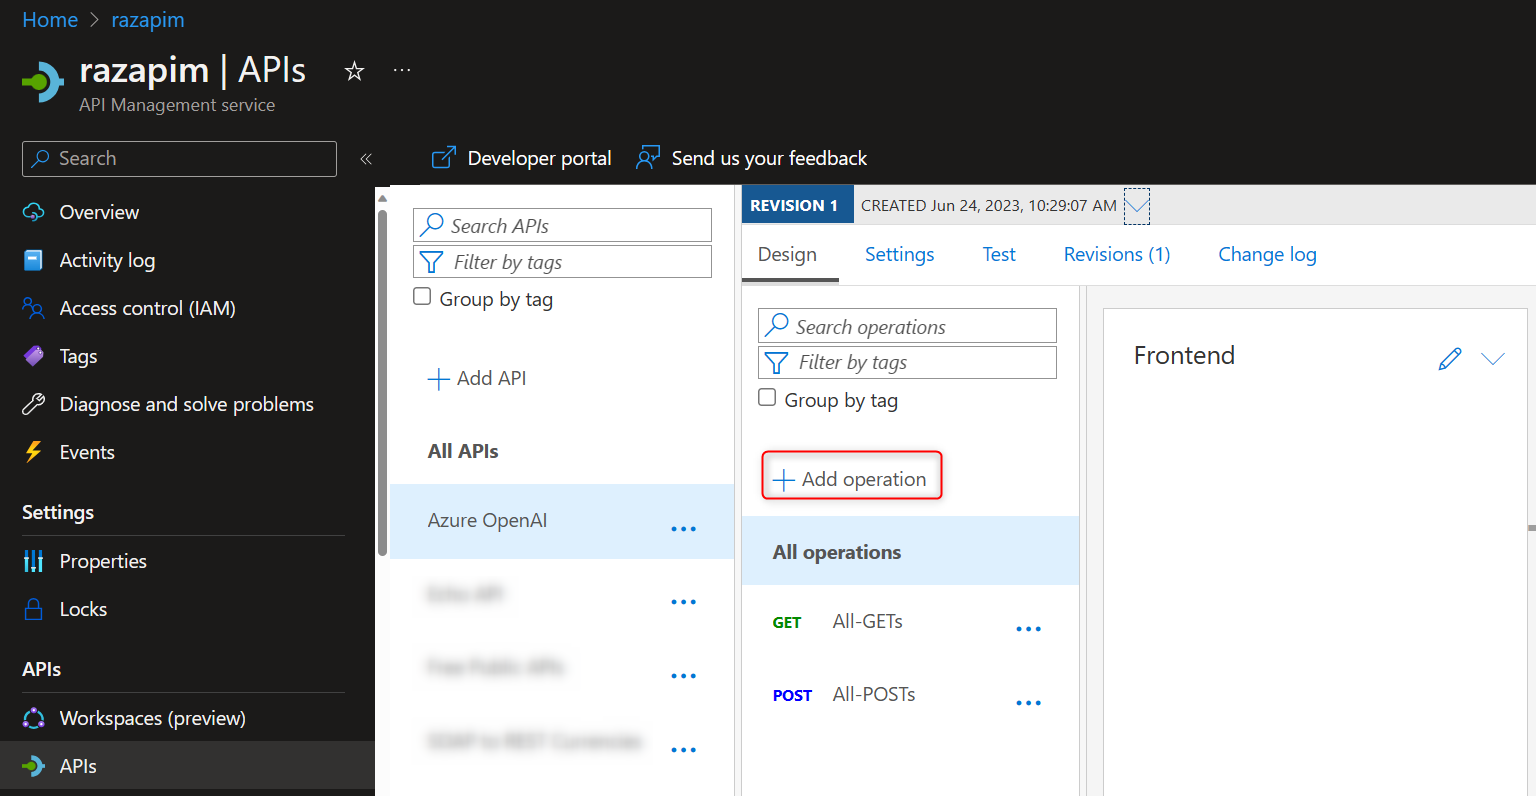
Step 2: Create a Catch-ALL OpenAI API
Step 3: Configure the API Policy
1
2
3
4
5
6
7
8
9
10
11
12
13
14
15
16
17
18
19
20
21
22
23
24
25
26
27
28
29
30
31
32
33
34
35
36
37
38
39
40
41
42
43
44
45
46
47
48
49
50
51
52
53
54
55
56
57
58
59
60
61
62
63
64
65
66
67
68
69
70
71
72
73
74
75
76
77
78
79
80
81
82
83
84
85
86
87
88
89
90
91
92
93
94
95
96
97
98
99
100
101
102
103
104
105
106
107
108
109
110
111
112
113
114
<!--
    One method to handle Azure OpenAI rate limits is to create multiple instances across multiple regions.

    This sample policy load balances API requests across 6 different openai endpoints, round-robin.
    It also fails over to the next service if an HTTP 4xx or 5xx is received.

    See here for how to configure multiple custom backends (with different api-keys) in Azure API Management: https://learn.microsoft.com/en-us/azure/api-management/backends
    This sample assumes that the model deployment IDs across the instances are the same.
-->
<policies>
    <inbound>
        <base />
        <!-- default values if wasn't specified by the caller -->
        <set-header name="Content-Type" exists-action="override">
            <value>application/json</value>
        </set-header>
        <set-query-parameter name="api-version" exists-action="skip">
            <value>2023-05-15</value>
        </set-query-parameter>

        <!-- use APIM managed identity to authenticate with OpenAI
             - managed identity should have "Cognitive Services OpenAI Contributor" role
             - if not using managed identity, set the api-key in the APIM backend configuration
        -->
        <authentication-managed-identity resource="https://cognitiveservices.azure.com/" />

        <!-- round robin load balancing of multiple OpenAI BE endpoints -->
        <cache-lookup-value key="backend-counter" variable-name="backend-counter" />
        <choose>
            <when condition="@(!context.Variables.ContainsKey("backend-counter"))">
                <set-variable name="backend-counter" value="1" />
                <cache-store-value key="backend-counter" value="1" duration="100" />
            </when>
        </choose>
        <choose>
            <when condition="@(int.Parse((string)context.Variables["backend-counter"]) % 5 == 1)">
                <set-backend-service backend-id="raz-aoai-eus" />
                <set-variable name="backend-counter" value="2" />
                <cache-store-value key="backend-counter" value="2" duration="100" />
            </when>
            <when condition="@(int.Parse((string)context.Variables["backend-counter"]) % 5 == 2)">
                <set-backend-service backend-id="raz-aoai-scus" />
                <set-variable name="backend-counter" value="3" />
                <cache-store-value key="backend-counter" value="3" duration="100" />
            </when>
            <when condition="@(int.Parse((string)context.Variables["backend-counter"]) % 5 == 3)">
                <set-backend-service backend-id="raz-aoai-weu" />
                <set-variable name="backend-counter" value="4" />
                <cache-store-value key="backend-counter" value="4" duration="100" />
            </when>
            <when condition="@(int.Parse((string)context.Variables["backend-counter"]) % 5 == 4)">
                <set-backend-service backend-id="raz-aoai-fc" />
                <set-variable name="backend-counter" value="5" />
                <cache-store-value key="backend-counter" value="5" duration="100" />
            </when>
            <otherwise>
                <set-backend-service backend-id="raz-aoai-uks" />
                <set-variable name="backend-counter" value="1" />
                <cache-store-value key="backend-counter" value="1" duration="100" />
            </otherwise>
        </choose>
    </inbound>
    <backend>
        <!-- if HTTP 4xx or 5xx occurs, failover to the next OpenAI BE endpoint -->
        <retry condition="@(context.Response.StatusCode >= 500 || context.Response.StatusCode >= 400)" count="10" interval="0" first-fast-retry="true">
            <choose>
                <when condition="@(context.Response.StatusCode >= 500 || context.Response.StatusCode >= 400)">
                    <choose>
                        <when condition="@(int.Parse((string)context.Variables["backend-counter"]) % 5 == 1)">
                            <set-backend-service backend-id="raz-aoai-eus" />
                            <set-variable name="backend-counter" value="1" />
                            <cache-store-value key="backend-counter" value="1" duration="100" />
                        </when>
                        <when condition="@(int.Parse((string)context.Variables["backend-counter"]) % 5 == 2)">
                            <set-backend-service backend-id="raz-aoai-scus" />
                            <set-variable name="backend-counter" value="2" />
                            <cache-store-value key="backend-counter" value="2" duration="100" />
                        </when>
                        <when condition="@(int.Parse((string)context.Variables["backend-counter"]) % 5 == 3)">
                            <set-backend-service backend-id="raz-aoai-weu" />
                            <set-variable name="backend-counter" value="3" />
                            <cache-store-value key="backend-counter" value="3" duration="100" />
                        </when>
                        <when condition="@(int.Parse((string)context.Variables["backend-counter"]) % 5 == 4)">
                            <set-backend-service backend-id="raz-aoai-fc" />
                            <set-variable name="backend-counter" value="4" />
                            <cache-store-value key="backend-counter" value="4" duration="100" />
                        </when>
                        <otherwise>
                            <set-backend-service backend-id="raz-aoai-uks" />
                            <set-variable name="backend-counter" value="1" />
                            <cache-store-value key="backend-counter" value="1" duration="100" />
                        </otherwise>
                    </choose>
                </when>
            </choose>
            <forward-request buffer-request-body="true" />
        </retry>
    </backend>
    <outbound>
        <base />
        <!-- Uncomment for debugging, this outputs the next backend-counter in the JSON response body. -->
        <!--
        <set-body>@{
            JObject body = context.Response.Body.As<JObject>();
            body.Add(new JProperty("backend-counter", ((string)context.Variables["backend-counter"])));
            return body.ToString();
        }</set-body>
        -->
    </outbound>
    <on-error>
        <base />
    </on-error>
</policies>
Step 4: Create APIM Products and Subscriptions
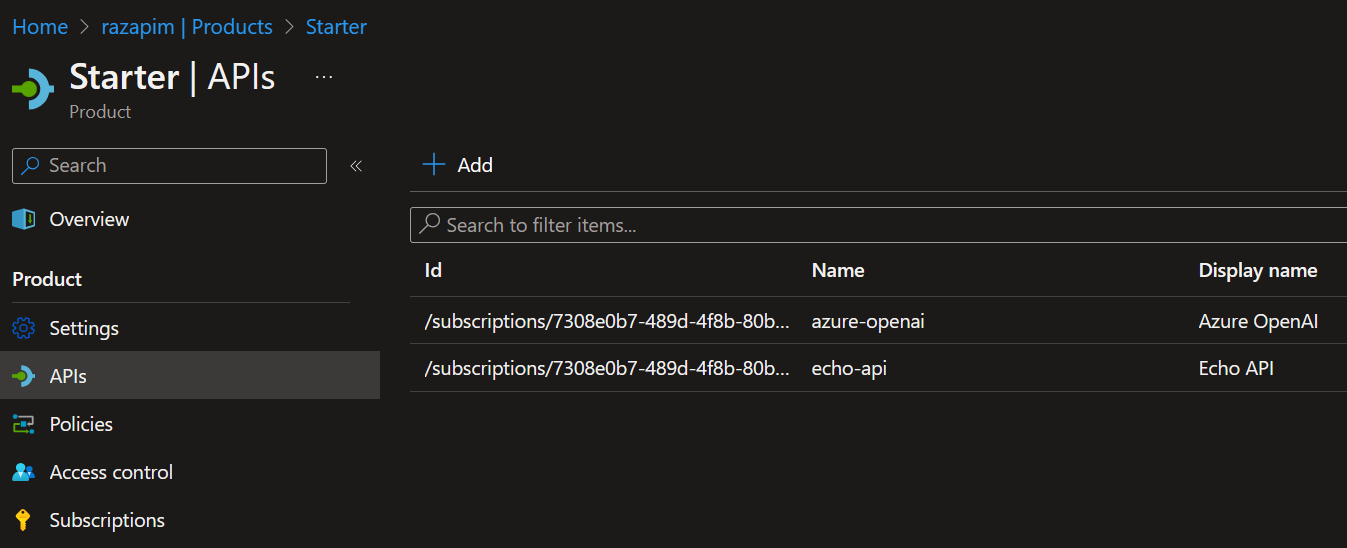
- In APIM→Products, add products as needed (APIM has default Starter and Unlimited products). Add the newly configured API to one of the products.
- In APIM→Subscriptions, create a new subscription and copy the new subscription key.
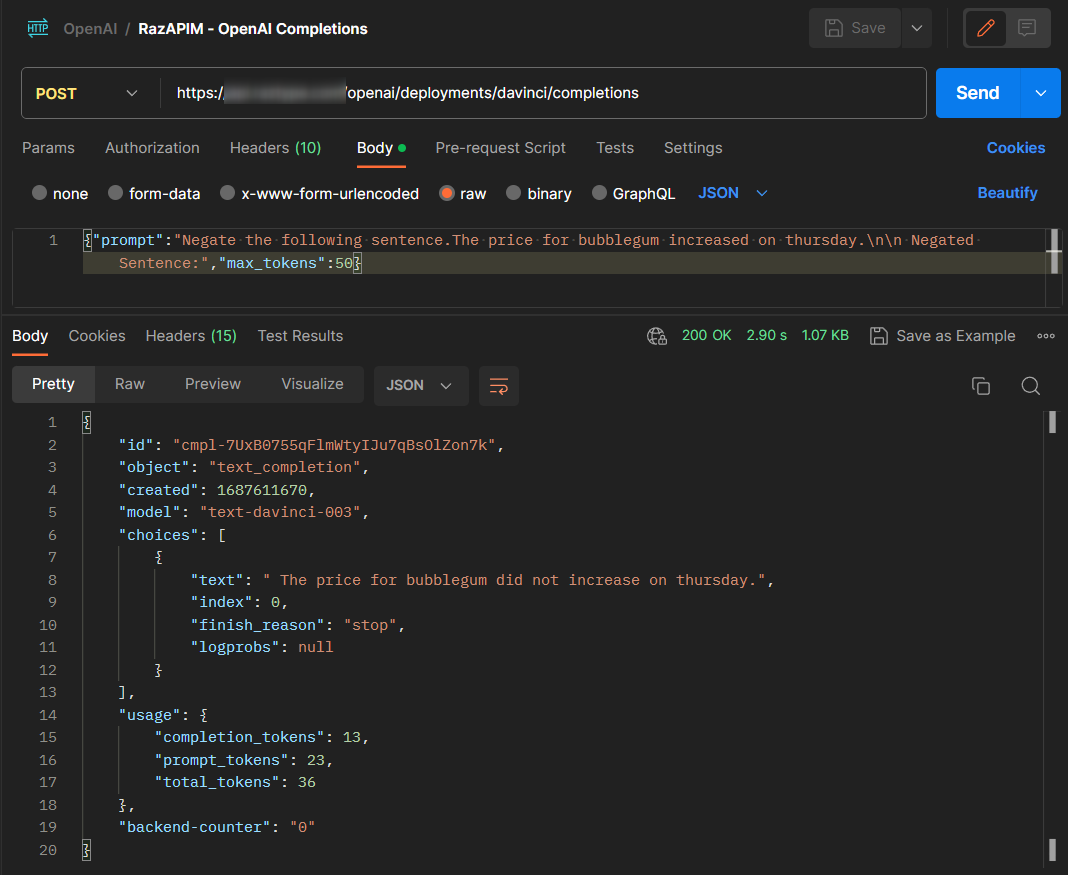
Step 5: Test the API
Call the API a few times and check the backend-counter. If you see the counter rotating then you have configured it successfully.
Conclusion
While newer models will have new (and hopefully higher) limits, it does not excuse you from not having a plan to handle the limits if and when you hit them. I hope this post will help you bring OpenAI-infused application to a large user base.
